 Sunday March 17, 2024
Creating Chrome- and Firefox-compliant local development certificates
Below shows the steps I followed for creating keys and certificates for local development (at https://localhost:port#) of Tomcat- and Vite-powered web applications. The process involves creating a local certificate authority (CA) with a self-signed certificate imported into Firefox and Chrome. Then I created a server key and certificate, the latter signed by the CA, to be used by both application servers. This is for work on a Mac OS with LibreSSL 2.6.5 used for the key commands, the process will vary a bit with other OS's or OpenSSL variants.
Before proceeding, there are a couple of shortcuts for working with self-signed certificates for local development, if perhaps you have only a little bit of development to do and can stand the browser unpleasantries during that time. For Firefox, you can choose to ignore the "self-signed cert" warning, with the development pages continually marked as "not secure" as a consequence. Chrome also provides a couple of options (here and here) for the same. Finally, if your motivation in creating a new key is because you've lost the public key and/or cert for a given private key, see this note on how both can be regenerated from that private key.
Create a Certificate Authority whose certificate will be imported into Firefox and Chrome. Although this certificate will be self-signed, the certificate for the server key that will be used by Tomcat and Vite will be signed by this CA. For these steps, I'm using genpkey to generate the private key and req to sign it, with a lifespan of 825 days as that's apparently the max permitted on MacOS. Note the RootCA requires a
CA:TRUEsetting which I'm providing below arootcert.extextension file.Place in ca/rootcert.ext:
basicConstraints = critical,CA:TRUE
(For the commands in this entry, using folders of ../certs and ../certs/ca)
openssl genpkey -algorithm RSA -out ca/MyCA.key -pkeyopt rsa_keygen_bits:2048 -aes-256-cbc
openssl req -new -sha256 -key ca/MyCA.key -out ca/MyCA.csr
openssl x509 -req -sha256 -days 825 -in ca/MyCA.csr -signkey ca/MyCA.key -out ca/MyCA.crt -extfile ca/rootcert.ext
Notes:
- The -aes-256-cbc setting provides for key encryption, for which you'll be asked to provide a password.
- "-sha256" is apparently the minimum accepted by Chrome, see here for further discussion.
- If asked for a challenge password, that can apparently be left blank.
- As for the configuration requested during the OpenSSL req command, I used "MyRootCA" as the Common Name for greater readability when viewing certificate chains. Note it needs to be different from the Common Name of any server certificate that it signs.
- Contents of the private key, certificate signing request, and certificate can be viewed using commands such as these:
openssl pkey -in MyCA.key -text -noout
openssl req -text -in MyCA.csr -noout
openssl x509 -text -in MyCA.crt -noout
Import the CA certificate into Firefox and Chrome.
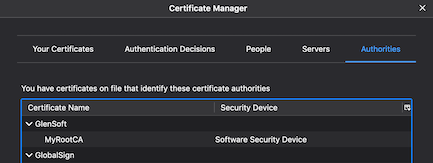
For Firefox, menu item Firefox -> Preferences -> Privacy & Security -> View Certificates button -> Authorities -> Import MyCA.crt, then select "Trust this CA to identify websites." The CA will be listed on the Authorities tab under the Organization name you gave when creating the CSR.
Chrome uses Apple's Keychain Access to store certificates. It can be activated from menu Chrome -> Preferences -> Privacy & Security -> Security Tab -> Manage Certificates. However, I found it clumsy to work with and simpler to use the command line:
sudo security add-trusted-cert -k /Library/Keychains/System.keychain -d ca/MyCA.crt
Once run, you'll find it under the system keychain, "Certificates" category in Keychain Access.
Create the server key in which you specify the domain name(s) applications using the key will be using. First thing to note is that Chrome requires usage of the subjectAltName extension when creating the key, Common Name alone will not work. There are several ways to configure this extension, the simplest I found that would work with my version of LibreSSL was to use an extension file as explained in the OpenSSL cookbook. (Note "TightBlog" refers to my open source project.)
Place in servercert.ext:
subjectAltName = DNS:localhost
Multiple domains can be specified, just make them comma-delimited.
Then run these commands:
openssl genpkey -algorithm RSA -out tightblog.key -pkeyopt rsa_keygen_bits:2048
openssl req -new -sha256 -key tightblog.key -out tightblog.csr
openssl x509 -req -in tightblog.csr -CA ca/MyCA.crt -CAkey ca/MyCA.key -CAcreateserial -out tightblog.crt -days 824 -sha256 -extfile servercert.ext
Configure the keys and/or certs on the development servers. For TightBlog development, the application runs on Tomcat, however I use Vite while developing the Vue pages, so I have two servers to configure. SSL information for Tomcat is here and some for Vite is here.
For Vue using Vite, I updated my vite.config.ts as follows:
...
import fs from 'fs'
...
export default defineConfig({
  ....
  server: {
    // https://stackoverflow.com/a/69743888
    https: {
      key: fs.readFileSync('/Users/gmazza/opensource/certs/tightblog.key'),
      cert: fs.readFileSync('/Users/gmazza/opensource/certs/tightblog.crt')
    },
    ....
  }
})
For Tomcat, I found Jens Grassel's instructions to be useful. He has us create a PKCS #12 key-and-certificate-chain bundle followed by usage of Java keytool to import the bundle into the keystore configured in the Tomcat server.xml file:
openssl pkcs12 -export -in tightblog.crt -inkey tightblog.key -chain -CAfile ca/MyCA.crt -name "MyTomcatCert" -out tightblogForTomcat.p12
keytool -importkeystore -deststorepass changeit -destkeystore /Users/gmazza/.keystore -srckeystore tightblogForTomcat.p12 -srcstoretype PKCS12
Whatever export password you enter for the upper command, use as the source password in the lower one. The
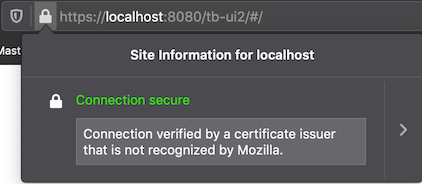
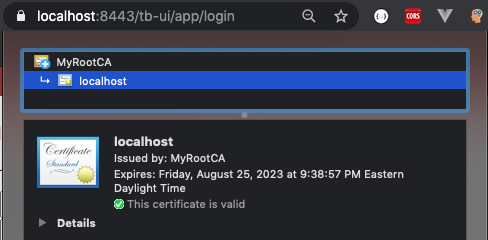
destkeystoreshould be whatever you have configured in your Tomcat server.xml for the SSL port. For Tomcat, you'll want no more than one alias (here, "MyTomcatCert") in the keystore, or specify the keyAlias in the Tomcat server.xml. The keytool list certs and delete alias commands can help you explore and adjust the Tomcat keystore.I activated the application in both browsers and checked the URL bar to confirm that the certificates were accepted. For my local development I have the application running on Tomcat at https://localhost:8443/ and the Vue pages running on Vite at https://localhost:8080. Examples showing the Vue URL on Firefox and the Tomcat one on Chrome are as below. Both URLs were accepted by both browsers, but note Firefox does caution that the CA the cert was signed with is not one of the standard CA certs that it ships with.
Posted by Glen Mazza in Programming at 07:00AM Mar 17, 2024 | Comments[1]
Comments
Hei! Thank you so much. It is very detailed! :D I was generating my CA this way:
openssl genrsa -des3 -out myCA.key 4096
openssl req -x509 -new -nodes -key myCA.key -sha256 -days 1024 -out myCA.crt
And it worked until last firefox version... I was trying things until I found your article.
5 stars! ;D
Posted by serxoz at 05:59AM Jun 17, 2022
Post a Comment:
Calendar
About Me

Blog Search
Recent Posts
Recent Comments
- - venkat reddy on Changing the row retention period for SFMC data extensions
- - serxoz on Creating Chrome- and Firefox-compliant local development certificates
- - Nitin Lokhande on Deploying TightBlog on Linode
- - Anant Jaynarayana on Deploying TightBlog on Linode
About Blog
Application Server: Tomcat 11
Database: MySQL
Hosted on: Linode
SSL Certificate: Let's Encrypt