 Friday December 08, 2023
Deploying TightBlog on Linode
I've updated the software running this blog to a new version of TightBlog, running on a standalone Tomcat on Ubuntu running on Linode. It's still a SNAPSHOT version with some things to fix. Below are my installation notes. Note many of these instructions hold for deploying any WAR-file in such an environment, so what I've written below may be useful for other apps.
Linode preparation:
- Sign up for Linode. Best to first check for special starting credits, usually given at the top of their documentation. I used the $12/month plan providing 2 GB of RAM which has always worked fine for my needs.
- For the starting image for my new Linode, I used Ubuntu 22.04 LTS with its default partition of 50688 MB and 512 MB for swap space.
- I followed the remainder of the Getting Started Guide and most of the recommendations of the subsequent Securing Your Server guide.
- If you don't want the default Linode domain name of lixxxx-yy.members.linode.com (as you probably don't) go to a domain name registrar such as Namecheap or Squarespace to rent your desired domain. I used the latter to obtain
glenmazza.netand then configured it for my linode following these instructions. - As recommended in the Securing Your Server guide, I used key-based authentication allowing me to easily connect to my linode using "ssh (or sftp) glenmazza.net" from a command-line on my home computer. (If you haven't gotten a custom domain name yet, you'll find the default name and IP address in the Public IPs section on the Remote Access tab in the Linode Manager.)
- I created a ~/tbfiles folder (owned by a non-root normal user account) as a staging area for files I'm uploading to my linode as well as to hold the TightBlog media file directories and (optionally) Lucene search indexes.
Tomcat preparation:
I installed OpenJDK 17 and then manually Tomcat on my image, using a non-root account. Another option, which I had problems getting to work before switching to the above (probably due to since-learned firewall configuration omissions on my part), is using sudo apt-get install, which if you use requires some extra configuration for it to work with JDK 17.
Either Tomcat install method above should result in
sudo systemctl [start|stop|restart] tomcat(or ...tomcat9) command-line instructions being available for starting and stopping Tomcat. After starting Tomcat, confirm you can access Tomcat's port 8080 from a browser using your linode's IP address.- Create a signed SSL certificate for use with Tomcat. I used Certbot which generates 3-month certificates, and these instructions for placing the key Let's Encrypt generates in a Java keystore that can be read by Tomcat. (The cited Certbot article shows how .pem files can be used directly, saving some steps. When I update in 3 months I will update the instructions below.) My steps from Linode every three months:
future note: update instructions to use pem files (see above)
sudo systemctl stop tomcat
For housekeeping on key updates, may wish to delete logs at /opt/tomcat/latest/logs
sudo -H certbot certonly --standalone -d glenmazza.net -d www.glenmazza.net
(see "Congratulations!" feedback indicating Let's Encrypt worked.  Any problem running?  Try this)
sudo -s
cd /etc/letsencrypt/live/glenmazza.net*
sudo openssl pkcs12 -export -in cert.pem -inkey privkey.pem -out cert_and_key.p12 -name tomcat -CAfile chain.pem -caname root
-- The above command will prompt you for a password for the temporary cert_and_key.p12 file.
-- Choose what you wish but remember for the next command ("abc" in the command below.)
-- The next command has placeholders for the Java key and keystore password (both necessary).  Choose what you wish but as I understand
-- Tomcat expects the two to be the same (can see previous password via sudo more /var/lib/tomcat8/conf/server.xml)
sudo keytool -importkeystore -destkeystore MyDSKeyStore.jks -srckeystore cert_and_key.p12 -srcstorepass abc -srcstoretype PKCS12 -alias tomcat -deststorepass <changeit> -destkeypass <changeit>
sudo cp MyDSKeyStore.jks /opt/tomcat/latest
sudo systemctl start tomcat
...confirm website accessible again at https://..., if not working ensure tomcat dirs all owned by tomcat user & restart
cd /etc/letsencrypt/live
sudo rm -r glenmazza.net*
The Java keystore password chosen above will need to be placed in the server.xml file next.
- Update the Tomcat conf/server.xml file to have HTTP running on port 80 and HTTPS on 443:
    <Connector port="80" protocol="HTTP/1.1"
               connectionTimeout="20000"
               URIEncoding="UTF-8"
               redirectPort="443" />
    <Connector port="443" protocol="org.apache.coyote.http11.Http11NioProtocol"
               maxThreads="150" SSLEnabled="true" scheme="https" secure="true"
               clientAuth="false" sslProtocol="TLS"
    keystoreFile="MyTomcatKeystore.jks" keystorePass="?????"/>
The keystore file referenced above would need to be placed in Tomcat's root directory, if you use another location be sure to update the keystoreFile value to include the path to the file.
- If you're using a non-root user to run Tomcat as suggested, you'll need to make some changes to allow that user to use privileged ports (ports under 1024, port 80 and port 443 in Tomcat's case). One way this can be done is via authbind. For authbind, first edit the
/etc/default/tomcat8file to activate it and then run a script similar to the following (replace "tomcat8" with the non-root user that is running Tomcat on your linode):sudo touch /etc/authbind/byport/80 sudo chmod 500 /etc/authbind/byport/80 sudo chown tomcat8 /etc/authbind/byport/80 sudo touch /etc/authbind/byport/443 sudo chmod 500 /etc/authbind/byport/443 sudo chown tomcat8 /etc/authbind/byport/443
Because the Ubuntu Linode I was using was running the UFW firewall by default, I needed further commands to be able to expose 80 and 443 to external browsers:
sudo ufw allow 80/tcp
sudo ufw allow 443/tcp
Use
sudo ufw statusto confirm the ports are available, for IPv4 you should see:Status: active To Action From -- ------ ---- OpenSSH ALLOW Anywhere 3306 ALLOW Anywhere 8080/tcp ALLOW Anywhere 80/tcp ALLOW Anywhere 443/tcp ALLOW Anywhere
MySQL preparation:
- Install MySQL on your linode.
- As explained in the TightBlog wiki, create the database that will hold the TightBlog data.
- (Optional) To connect to the MySQL database on your linode using SquirrelSQL or another SQL client running on your local computer, these instructions will help.
TightBlog deployment:
- I built the TightBlog war following these instructions and renamed it to ROOT.war so it will be Tomcat's default application (i.e., have a shorter URL,
https://yourdomain.com/instead ofhttps://yourdomain.com/tightblog). The WAR file will need to be placed in the Tomcat webapps folder as usual. - There are three files that need to be uploaded to the Tomcat /lib folder, as explained on the Deploy to Tomcat page on the wiki: slf4j-api-1.7.25.jar, your JDBC driver (mysql-connector-java-X.X.X-bin.jar for MySQL), and the
application-tbcustom.propertiesfile (sample). Create or download these as appropriate. - The application-tbcustom.properties makes reference to folders used for storing media files and search index information, for example
/home/gmazza/tbfiles/mediafiles. Note for Tomcat to be able to read and write from these folders, the leaf folder (here,mediafilesshould have the ownership of the user account running Tomcat (e.g.tomcat:tomcat), and that user must have execute permissions for every parent folder. - For uploading files from your computer to your linode, see the scp or sftp commands, for example:
scp ROOT.war myaccount@glenmazza.net:~/tbfiles. However, I prefer "sftp glenmazza.net", navigating to desired folders, and using "put" or "get" to upload or download respectively. - After uploading the files and placing them in their proper locations, restart Tomcat and start the TightBlog application install process at
https://yourdomain.com[/tightblog].Troubleshooting: if accessing https://yourdomain.com[/tightblog] from a browser returns 404's while you can still ping the domain, check to see if you can access that URL from a terminal window that is SSH'ed into your Linode using the command-line Lynx browser. If you can, that would mean Tomcat is running properly but there is most likely a problem with the authbind or iptable rerouting preventing external access. If you can't, Tomcat configuration should be looked at first.
- Best to create a test blog entry, and create a database backup and restore process and confirm it is working with your database instance (e.g., add a blog entry after the backup, restore the backup and confirm the new entry disappears, or delete a blog entry after a backup and confirm the restore returns it.) Simple commands for MySQL would be as follows (see here for more details on available commands):
Export to a file:
mysqldump -u root -p tightblogdb > db_backup_YYYYMMDD.sql
Import into the database to restore it:
mysql -u root tightblogdb < db_backup_YYYYMMDD.sql
Best to save the backup copy outside of the linode (e.g., on your local machine) and create a regular backup routine.
- Soon after the blog is up, good to check if the emailing is working by sending yourself a comment for a blog entry. If no email is received, check the tightblog.log in the Tomcat logs folder for any mail sending exceptions. If you're using GMail and there is an authorization problem, the error logs may provide you a precise link at accounts.google.com where you can authorize TightBlog to use the email account.
Posted by Glen Mazza in Programming at 07:00AM Dec 08, 2023 | Comments[2]
Monday November 06, 2023
Java Client for Adobe Marketo
I created a Spring OAuth2-based Marketo client, located in my blog-samples project on Github. Its format follows clients I had created previously for Salesforce CRM and Domo. While only a relatively small subset of the Marketo API is covered, the client covers some of its most important functionality, including:
Lead maintenance, including querying, creating, updating, and deleting leads
Activities - limited, just querying activity types supported
Bulk Extracts - creating, enqueuing, polling, and downloading CSVs, both for leads and activities. Note there is a
marketo.max.response.size.mbproperty used in the client's MarketoOAuth2Config class that can be increased beyond its default 2MB for larger downloads.
Should additional functionality be needed it should be reasonably straightforward to expand the client.
The functionality is well-tested by means of the integration tests provided in the project, which also serve as examples of how to work with the client. Note also the configuration instructions given in its properties file, needed for projects using this client.
Posted by Glen Mazza in Programming at 02:00AM Nov 06, 2023 | Tags: marketo | Comments[0]
Monday August 07, 2023
Java Client for Domo
Updated February 2024
At work we use Domo for analysis of customer behavior. We have a need to retrieve data stored in Domo DataSets, which are its rough equivalent to database tables. While Domo offers their own Java SDK, it hasn't been updated lately, and so I thought it better to create my own client, leveraging what I had done earlier for a Salesforce CRM client, with its Spring OAuth client support. Note the client currently supports just DataSets, specifically querying dataset metadata and contents (methods are in DataSetQueryRunner). Domo offers several other APIs which the client can probably be expanded to support without too much difficulty, leveraging what the DataSet calls do.
The Java client is available in the blog-samples GitHub project. Steps to use:
Follow the Domo documentation to create a client ID and secret, and also to create an access token. In both cases, just the "data" scope is needed. The access token will not be used by the Java client, but will be used next to test permissions.
Confirm the client credentials have the permissions necessary to access the desired DataSets. Use the access token to list the DataSets you have access to and then query one or more. The list call will give you the DataSet ID needed for the subsequent query. If you cannot see the desired DataSet in the list call, or if the query is not returning the DataSet's rows, your account's permissions may need to be adjusted before proceeding further.
Confirm the Java client can work with those credentials. The RestServicesTest provides examples for querying DataSet metadata and contents. Update the desired queries with your desired DataSet ID and/or name as given in the comments. Also, follow the instructions in the resources/application-test.properties file for adding your client credentials, making sure of course to not accidentally move them to public source control.
Once all is configured, run the test class(es) from either from your IDE debugger or from the command-line (
./gradlew clean build integrationTest) to ensure connectivity and functionality working.The integration test for the content query mostly queries the returned metadata as querying specific data would be dependent on the DataSet that you plugged in. By running the test in an IDE debugger you can see the actual data returned, but a sample format is already given as a comment in the client's DataSetQueryResponse. Note the returned data, given as the
List<List<String>> rowsin this class, shows that all data is returned as strings and must be queried via row and column to retrieve:// for each row of DataSet for (List<String> row : response.getRows()) { // query the row's columns, converting to different types as desired String col1 = row.get(0); int col2 = Integer.parseInt(row.get(1)); ... }Note the columns are ordered as they were in the query given in the DataSetQueryRequest.
Client credentials appear to be specific to the user creating them, and are hence limited to the DataSet access permissions that user has. Should the user lose access, another set of client credentials will need to be created.
Domo does not appear to have any direct support for pagination. If you have a very large DataSet, adding a column with an incrementing number, and using the column in a WHERE clause, may be the best option.
Another option for downloading large datasets, if your deployment has the memory available, there is also a
domo.max.response.size.mbproperty used in the client's DomoOAuth2Config class that can be adjusted.
Notes
Posted by Glen Mazza in Programming at 03:00AM Aug 07, 2023 | Tags: domo | Comments[0]
Saturday May 20, 2023
Using Micrometer to send custom metrics to Datadog
This entry provides a simple example of using Spring Shell (within Spring Boot) and Micrometer to send custom metrics to Datadog. For a fuller example with Docker and the Datadog Agent, I recommend Datadog Learning Center's free Datadog 101: Developer course. This course will also provide you a free two-week training Datadog account which you can use to receive custom metrics for this example, useful if you don't care to test against your company account. Note custom metrics ordinarily carry billing costs, requiring a paid Datadog account.
Spring Boot already provides numerous web metrics in several areas that can be sent to Datadog without explicit need to capture them. The jvm.* properties, for example, are readable in Datadog's Metrics Explorer, filtering by statistic:value for this example in the "from" field. For custom metrics, we'll have the Spring Shell app commands modify a Timer and a Gauge.
Create the Spring Shell application. From Spring Initializr, choose a Java JAR app with Spring Shell and Datadog as dependencies. For some reason I needed to choose the Spring Boot 2.7.x series for an app to download. Prior to running the demo in your IDE (I use IntelliJ), the
management.metrics.export.datadog.apiKey=...value needs to be added to the main/resources/application.properties file. Your API key can be determined by logging into Datadog, and from the bottom of the left-side menu, click on your name, then Organization Settings, then Access, the API Keys.Create the shell commands to add to the timer and gauge values:
package com.example.demo;
import io.micrometer.core.instrument.MeterRegistry;
import io.micrometer.core.instrument.Tags;
import io.micrometer.core.instrument.Timer;
import org.springframework.shell.standard.ShellComponent;
import org.springframework.shell.standard.ShellMethod;
import java.util.ArrayList;
import java.util.List;
import java.util.concurrent.TimeUnit;
@ShellComponent
public class MyCommands {
    private final Timer timer;
    private final List<Integer> integerList;
    public MyCommands(MeterRegistry registry) {
        timer = registry.timer("demoapp.timer", Tags.empty());
        integerList = registry.gauge("demoapp.listsize", Tags.empty(), new ArrayList<>(), List::size);
    }
    @ShellMethod("Note a timer event of given duration in seconds")
    public String timer(int seconds) {
        timer.record(seconds, TimeUnit.SECONDS);
        return "Timer event noted";
    }
    @ShellMethod("Add an element to list")
    public String listAdd() {
        integerList.add(10);
        return "List has " + integerList.size() + " elements";
    }
    @ShellMethod("Remove an element from list (if possible)")
    public String listRemove() {
        if (integerList.size() > 0) {
            integerList.remove(integerList.size() - 1);
        }
        return "List has " + integerList.size() + " elements";
    }
}
For the above we're keeping a gauge on the size of the list, and for the timer, we provide the number of seconds that an arbitrary event took.
Run the application and enter several
timer #secs,list-add, andlist-removecommands. Run -> Run Application from the IntelliJ menu should work fine to enter the commands in the IDE's Console view. To keep the connection with Datadog, keep the command-line app running, even if you're not entering commands. After 2 or 3 minutes, check Datadog's Metrics Explorer to confirm that thedemoapp.timeranddemoapp.listsizemetrics are getting received: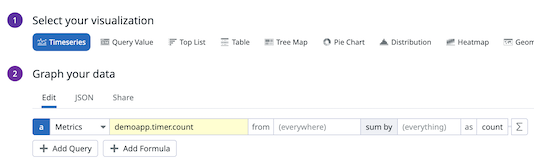
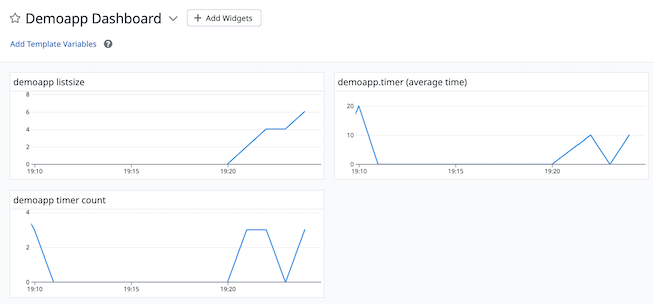
A dashboard can be created to show both properties at once (with separate average time and counts given for the Timer):
Resources
- Metrics - Spring Boot docs
- Custom metrics can also be defined via JMX with Datadog's JMX Integration (tutorial)
- Micrometer tutorial - by Baeldung, using Netflix Atlas instead of Datadog
Posted by Glen Mazza in Programming at 03:00AM May 20, 2023 | Tags: datadog | Comments[0]
Sunday May 14, 2023
Using MySQL testcontainers with Spring Boot and Flyway
For a Spring Boot application accessing a Flyway-managed MySQL database, I updated its integration tests from using in-memory HSQLDB to Testcontainers' MySQL module. This was both to have testing be done on a database more closely matching deployment environments and also to have various tables pre-populated with standard data provided by our Flyway migration scripts. I'm happy to report that the cost of these benefits was only a slight increase in test running time (perhaps 10-15% more time), and that despite there being 170 Flyway migrations at that time of the conversion.
It is best to use Testcontainers when starting to develop the application, so any hiccups found in a Flyway migration file can be fixed before that migration file becomes final. Switching to testcontainers after-the-fact uncovered problems with some of our migration scripts requiring additional configuration of the MySQL testcontainer. The main problems were unnecessary explicit specification of the schema name in the scripts, and a suboptimal definition of a table that required explicit_defaults_for_timestamp to be configured in MySQL. This configuration was in our deployment my.cnf files but not in the default one used by the MySQL testcontainer.
Solving the first issue involved explicit specification of the username, password, and database name when creating the Testcontainers instance. Initializing the MySQL container just once for all integration tests is sufficient for our particular application, so TC's Manual container lifecycle control which uses Java configuration was used:
@SpringBootTest
@ActiveProfiles("itest")
public class MyAppIntegrationTest {
    private static final MySQLContainer MY_SQL_CONTAINER;
    static {
        MY_SQL_CONTAINER = new MySQLContainer("mysql:5.7")
                .withUsername("myappUser")
                .withPassword("myappPass")
                .withDatabaseName("myapp");
        MY_SQL_CONTAINER.start();
    }
    @DynamicPropertySource
    public static void containersProperties(DynamicPropertyRegistry registry) {
        registry.add("spring.datasource.username", MY_SQL_CONTAINER::getUsername);
        registry.add("spring.datasource.password", MY_SQL_CONTAINER::getPassword);
        registry.add("spring.datasource.url", MY_SQL_CONTAINER::getJdbcUrl);
    }
}
The containersProperties call dynamically populates the given Spring boot config values with those provided from the MySQL testcontainer. Note the spring.datasource.url will be a "regular" MySQL URL, i.e., Spring Boot and Flyway are unaware that the database is a Testcontainers-provided one.
When doing Java-based instantiation of the MySQL instance as above, I've found adding the standard property file configuration of the MySQL testcontainer to be unnecessary and best avoided -- doing so appeared to create a second, unused, container instance, slowing down builds. However, if you choose to use properties-only Java configuration (perhaps wishing to instantiate and initialize MySQL testcontainers more frequently during the integration tests), configuration similar to the below should work. Note the "myappdatabase", "myuser" and "mypass" values given in the url property are used to tell Testcontainers the values to set when creating the database and the user. In turn, whatever values placed here should go into the standard Spring username and password properties as shown:
spring.flyway.enabled=true
spring.datasource.url=jdbc:tc:mysql:5.7://localhost/myappdatabase?user=myuser&password;=mypass
spring.datasource.driver-class-name=org.testcontainers.jdbc.ContainerDatabaseDriver
spring.datasource.username=myuser
spring.datasource.password=mypass
Fixing the second issue involved using a different my.cnf for the MySQL testcontainer. To accomplish that I copied the mysql-default-conf/my.cnf directory and file from the org.testcontainers.mysql:1.17.6 library (easily viewable from IntelliJ IDEA) and pasted it as src/itest/resources/mysql-default-conf/my.cnf in the Spring Boot application. From the latter location I added my needed change.
Notes:
The Gradle dependencies used to activate the MySQL testcontainer in the integration test environment:
configurations { integrationTestImplementation.extendsFrom testImplementation integrationTestRuntimeOnly.extendsFrom testRuntimeOnly } dependencies { integrationTestImplementation 'org.springframework.boot:spring-boot-starter-test' integrationTestImplementation 'org.testcontainers:mysql' integrationTestImplementation 'org.testcontainers:junit-jupiter' }- As the migrations are kept in the main/resources folder, in the standard db/migration subdirectory, I thought I could perhaps just create overriding migrations in the corresponding itest/resources subdirectory for the few migrations with problems, and that Flyway would use the overrides over the ones in the main/resources folder. That did not work, though, Flyway halts with a complaint about duplicate filenames between the two folder locations.
Further resources:
- One-Stop Guide to Database Migration with Flyway and Spring Boot - Article from Reflectoring.io covering Spring Boot and Flyway together (not Testcontainers-specific).
- Execute Flyway Database Migrations on Startup - SpringBoot docs
Posted by Glen Mazza in Programming at 03:00AM May 14, 2023 | Comments[0]
Friday May 12, 2023
Composite API added to Salesforce CRM Java Client
I've added support for the Composite API to my Salesforce CRM Java client, in particular for updates and inserts. This API method allows for up to 25 subrequests at the cost of just one API call (with a few other limitations depending on the types of calls made). For insertion-only requests, where the items being inserted are not related to each other, the Multiple Record Insertion technique added earlier to the client is probably best, as it allows for up to 200 insertions in one API call.
For tl;dr; purposes, reviewing the testMultipleEntityRecordInsertionsAndCompositeCalls() test case shows how a Composite API call can be made with this client. The sample makes one request consisting of one insert and two updates, and shows how to obtain the fields returned in both success and error scenarios. An example Multiple Record Insertion technique is in the same test.
As shown in the Salesforce docs, composite calls consist of a series of objects with four fields: method, url, referenceId, and body:
{
"compositeRequest" : [{
  "method" : "POST",
  "url" : "/services/data/v57.0/sobjects/Account",
  "referenceId" : "refAccount",
  "body" : { "Name" : "Sample Account" }
  },{
  "method" : "POST",
  "url" : "/services/data/v57.0/sobjects/Contact",
  "referenceId" : "refContact",
  "body" : {
    "LastName" : "Sample Contact",
    "AccountId" : "@{refAccount.id}"
    }
  }]
}
The method will be POST for inserts and PATCH for updates, while the url field refers to the object being inserted/updated. Example URL formats for Accounts:
Inserts:
/services/data/vXX.X/sobjects/AccountUpdates:
/services/data/vXX.X/sobjects/Account/id/(SF ref ID of Account)
To provide these fields, the client provides an abstract CompositeEntityRecord, taking care of all fields but the body, the latter to be provided by subclasses the developer creates.
public abstract class CompositeEntityRecord {
    @JsonIgnore
    private final String entity;
    private final String referenceId;
    private final Method method;
    // URL dynamically generated when making request
    private String url;
    // getters and setters
}
The entity is @JsonIgnored as it is not part of the JSON object sent to Salesforce. As the URL contains the Salesforce API version and other call-specific data, it will be dynamically generated by the SalesforceCompositeRequestService at the time of the call. A sample CompositeEntityRecord subclass, to update an Account's site and number of employees:
public class AccountUpdateCompositeRecord extends CompositeEntityRecord {
    private Body body = new Body();
    public AccountUpdateCompositeRecord(String referenceId) {
        super("Account", Method.PATCH, referenceId);
    }
    public Body getBody() {
        return body;
    }
    public static class Body {
        public int numberOfEmployees;
        public String site;
        // getters and setters
    }
}
For updates, the id should not be placed in the body, that will instead be placed in the url field at the time of the service call (below). The referenceId needs to be a unique value for all subrequests of the composite request. For updates, the SF ID of the object being updated (unless you're updating one item multiple times in the same call) would be an excellent fit.
Insertions will normally involve more fields, so it will be usually necessary to create another subclass with its additional fields. Also, there won't be a SF ID yet, so just choose a unique string for each reference ID in the composite call. In the response coming back, use the same ID to obtain the subrequest's results.
public class AccountInsertCompositeRecord extends CompositeEntityRecord {
    private final Body body = new Body();
    public AccountInsertCompositeRecord(String referenceId) {
        super("Account", Method.POST, referenceId);
    }
    public Body getBody() {
        return body;
    }
    public static class Body {
         ....
    }
The client provides a CompositeEntityRecordRequest to hold all the subrequests:
public class CompositeEntityRecordRequest {
    boolean allOrNone;
    List<? extends CompositeEntityRecord> compositeRequest;
    public CompositeEntityRecordRequest(boolean allOrNone) {
        this.allOrNone = allOrNone;
    }
    // getters and setters
}
See the Salesforce Docs for the usage of allOrNone, due to its importance it is placed in the constructor to require it to be specified. For the response returned by the Composite API call, the CompositeEntityRecordResponse class below is used. The format of the result body returned from Salesforce is unfortunately different in the success (Map) and failure cases (List of Map), so the Result.body field is declared as an Object. However, there are helper methods getSuccessResultsMap() and getErrorResultsList() in the Result object to help you parse the body (see the client test case mentioned above for an example of both). By first reading the Result's httpStatusCode you can determine the proper method to call.
package net.glenmazza.sfclient.model;
import java.util.List;
import java.util.Map;
public class CompositeEntityRecordResponse {
    List<Result> compositeResponse;
    // getters and setters
    public static class Result {
        private int httpStatusCode;
        private String referenceId;
        private Map<String, String> httpHeaders;
        private Object body;
        // getters and setters
        public Map<String, Object> getSuccessResultsMap() {
           // ...
        }
        public List<Map<String, Object>> getErrorResultsList() {
           // ...
        }
    }
}
As shown in the test case, once the CompositeEntityRecordRequest object is created, a call to the client's SalesforceCompositeRequestService is straightforward:
CompositeEntityRecordResponse cerr = scrs.bulkProcess(cerReq);
Further Resources:
How to Use Salesforce Composite Rest API - Roycon website
Posted by Glen Mazza in Salesforce CRM at 03:00AM May 12, 2023 | Comments[0]
Sunday May 07, 2023
Java Client for Salesforce CRM API calls
Updated May 2023.
I've made available on GitHub a Spring Security-based client library for making OAuth2-enabled REST calls to Salesforce CRM's API. The library supports use of Salesforce's:
SOQL Query: These are handled by the SOQLQueryRunner which provides two options for responses: a JSON-formatted string or a developer-defined parameterized implementation of SOQLQueryResponse (example in the integrated test). The latter takes advantage of the fact that SOQL queries share much common structure and need only a relatively small portion to be overridden to hold fields specific to the SOQL query.
Multiple Record Insertion: See Inserting multiple Salesforce CRM records with a single API call for more details.
Composite API: See Composite API added to Salesforce CRM Java Client for more details.
For authentication, supported are Salesforce's JWT Bearer Token and username/password flows discussed in my earlier blog post. Spring Security's OAuth 2 client are used to obtain access tokens necessary for making these calls.
The integrated test cases give examples of the client in action. As they involve creating, updating, and deleting Salesforce Accounts they should be run against a non-production instance. Salesforce offers free developer instances. Note the test case for the Apex REST functionality will require installing this Apex REST endpoint from the Salesforce documentation. To run the tests, first create an application-test.properties file in the itest resources folder with the configuration necessary for the flow you are using. There is a template file in that folder specifying what is needed for each OAuth2 flow type. For usage of this library by other applications, this configuration would be placed in the importing application's properties file. The library's SalesforceOAuth2Config class reads that configuration, and will halt on startup with informational messages if anything needed is missing. Once done, the integrated tests can be run from IntelliJ or command-line via ./gradlew integratedTest.
The Username/Password flow is supported out of the box by Spring, but the JWT bearer token flow requires some extra classes implemented in the client:
- SalesforceJwtBearerOAuth2AuthorizedClientProvider - For each outgoing request to a resource server, checks if the JWT Bearer Token method is being used for access tokens and also if an authorized client (i.e., one with a valid access token) is already available. If yes and no, respectively, initiates the process to obtain a new access token to use with the resource API call.
- OAuth2SalesforceJwtBearerGrantRequest - created by above class, it holds the information necessary to create the JWT bearer token for making an access token request.
- OAuth2SalesforceJwtBearerGrantRequestEntityConverter - Constructs the JWT bearer token
- SalesforceJwtBearerTokenResponseClient - Uses the JWT Bearer token created by the above class to obtain a new access token from the authorization server.
What happens when access tokens expire? The WebClient calls have a retry(1) setting that allows for one additional call to the resource server in case of an error such as using an expired access token. In such cases, for the first call, the failure handler in SalesforceOAuth2Config removes the authorized client instance (which has the invalid access token) from memory. For the retry call, SalesforceJwtBearerOAuth2AuthorizedClientProvider notes that there is not an authorized client instance anymore so proceeds to obtain a new access token to allow the second call to proceed. This functionality can be verified by revoking the access token from either Salesforce Setup's Session Management screen or from Connected Apps usage, and confirming that a subsequent resource API call still provides the data. Code breakpoints can also be used to confirm another access token was requested.
Additional Resources
- OAuth 2.0 Client - official Spring documentation
- Carey Development - Blog contains many useful tutorials, including on logging exceptions and reporting them to clients helpful for the creation of this client library.
- Spring WebClient – GET, PUT, POST, DELETE examples
- Spring 5 WebClient and WebTestClient Tutorial with Examples
- Salesforce Username/Password Flow Example - Very helpful in creating the Username-Password flow option in this library.
Posted by Glen Mazza in Salesforce CRM at 03:00AM May 07, 2023 | Comments[0]
Friday May 05, 2023
Adding a custom grant type to Spring Authorization Server
Basit-Mahmood Ahmed has provided a nice example of adding a custom grant to Spring Authorization Server, providing a replacement for the "resource owner" grant removed from the OAuth 2.1 standard. I was able to leverage that for providing our own resource owner implementation. At work we've needed to create several types of custom grants, thankfully what started off as perplexing to implement, due to repetition became rather routine. Best starting advice I can to examine the out-of-the-box provided grant types and follow along with them. The Reference Guide of course and YouTube videos are also valuable, for example Getting Started with Spring Authorization Server and Configuring and Extending Spring Authorization Server.
For each custom grant type to support under Spring Auth Server, I've normally found five extra source files needed, as well as adjusting a couple of others. Most classes are limited in responsibilities helping keep their creation straightforward. Providing links to Basit-Mahmood's example where applicable, as well as some unrelated additional code samples:
The custom grant Token class (example): Extending OAuth2AuthorizationGrantAuthenticationToken, this class holds the properties used by the Provider (discussed below) to authenticate the client. For the resource owner grant, it would have username and password. For a grant based on incoming IP Address, it would be an IP address string. This class is also a good place to define the custom token grant_type parameter used in the OAuth2 token request.
The custom grant Converter class (example): This class takes the incoming HttpServletRequest and, by reading its properties, creates an instance of the Token class. Parameter validation for obvious shortcomings (missing param values, etc.) are good to do here, to help keep the Provider uncluttered.
The Provider class (example): This class takes the Token created by the Converter and authenticates and authorizes the grant. In general, there are two parts to this: authentication of the token, frequently handled by two other classes, discussed below, followed by construction of the JWT, partly in the Provider and partly in the OAuth2TokenCustomizer discussed below.
A token to represent the resource owner. This class will extend from AbstractAuthenticationToken, and will be used both to authenticate a user and to represent the user after authentication.
package ...;
import org.springframework.security.authentication.AbstractAuthenticationToken;
import org.springframework.security.core.GrantedAuthority;
...
public class MyInnerAuthenticationToken extends AbstractAuthenticationToken {
    private final MyAccessUser myAccessUser;
    // constructor for user-to-validate
    public MyInnerAuthenticationToken(String propertyToCheck) {
        super(null);
        this.myAccessUser = new MyAccessUser(propertyToCheck);
    }
    // constructor for validated user
    public MyInnerAuthenticationToken(MyAccessUser myAccessUser,
                                       Collection authorities) {
        super(authorities);
        this.myAccessUser = myAccessUser;
        super.setAuthenticated(true); // must use super, as we override
    }
    @Override
    public Object getPrincipal() {
        return this.myAccessUser;
    }
    @Override
    public void setAuthenticated(boolean isAuthenticated) throws IllegalArgumentException {
        Assert.isTrue(!isAuthenticated,
                "Cannot set this token to trusted - use constructor which takes a GrantedAuthority list instead");
        super.setAuthenticated(false);
    }
    @Override
    public String getName() {
        return this.myAccessUser.getName();
    }
}
Another Provider to authenticate the above token. This would be called by the OAuth2 grant Provider during authentication. This Provider implements the standard authenticate(Authentication) method, returning a new Token populated with the principal and its authorities.
@Service
public class MyInnerAuthenticationProvider implements AuthenticationProvider {
    private static final Logger LOGGER = LoggerFactory.getLogger(MyInnerAuthenticationProvider.class);
    @Autowired
    private MyAuthenticator authenticator;
    @Override
    public Authentication authenticate(Authentication authentication) throws AuthenticationException {
        MyAccessUser unvalidatedUser = (MyAccessUser) authentication.getPrincipal();
        String ip = unvalidatedUser.getIpAddress();
        MyAccessUser validatedAccessUser = authenticator.checkIpAddress(ip);
        if (validatedIPAccessUser != null) {
            Collection<GrantedAuthority> authorities = authenticator.toGrantedAuthorities(
                    validatedAccessUser.getPermissions());
            return new MyInnerAuthenticationToken(validatedAccessUser, authorities);
        } else {
            LOGGER.warn("Could not validate user {}", unvalidatedUser);
            return null;
        }
    }
    @Override
    public boolean supports(Class<?> authentication) {
        return MyInnerAuthenticationToken.class.isAssignableFrom(authentication);
    }
}
Spring Authorization Server allows for creating an OAuth2TokenCustomizer implementation for adding claims to a JWT common to multiple grant types. It should get picked up automatically by the framework's JwtGenerator. If you've created one, good to review at this stage any adjustments or additions that can be made to it as a result of the new custom grant.
@Component
public class MyTokenCustomizer implements OAuth2TokenCustomizer {
    public void customize(JwtEncodingContext context) {
        JwtClaimsSet.Builder claimsBuilder = context.getClaims();
        claimsBuilder.claim(ENVIRONMENT_ID, environment);
        // Spring Auth Server's JwtGenerator does not provide JTI by default
        claimsBuilder.claim(JwtClaimNames.JTI, UUID.randomUUID().toString());
        Authentication token = context.getPrincipal();
        // can add principal-specific claims:
        if (token.getPrincipal() instanceof MySubjectClass chiefJwtSubject) {
           ...
        }
    }
}
Once completed, now time to wire new grant support within the authorization server. To wire up the grant-level Converter and Provider, within a WebSecurityConfigurerAdapter subclass:
Listconverters = new ArrayList<>(); converters.add(resourceOwnerPasswordAuthenticationConverter); authorizationServerConfigurer .tokenEndpoint(tokenEndpoint -> { tokenEndpoint.accessTokenRequestConverter(new DelegatingAuthenticationConverter( converters)) // lots more providers .authenticationProvider(resourceOwnerPasswordAuthenticationProvider) } );
The mini-level Provider, used for the actual authentication of the User, can be configured separately as a @Bean:
@Bean
public MyInnerAuthenticationProvider myInnerAuthenticationProvider() {
    return new MyInnerAuthenticationProvider();
}
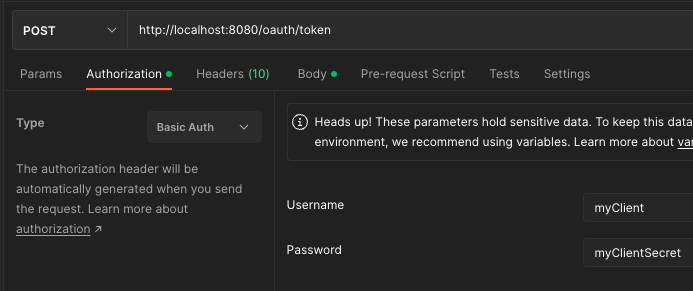
Once developed, easy to test with Postman. Spring Auth Server uses an oauth2_registered_client table where the client_id and client_secret for clients are defined. Within Postman, Authorization tab, choose Basic Auth type and enter the client ID and secret as the credentials:
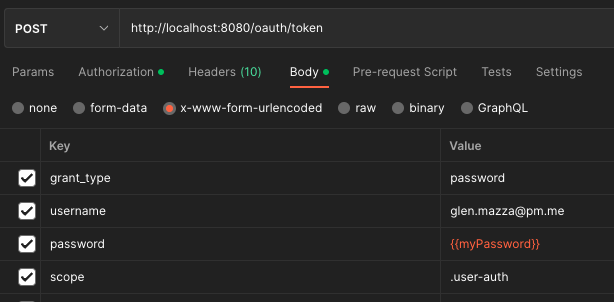
Then the new grant type can be tested with a POST call to the standard oauth/token endpoint using that grant_type:
Posted by Glen Mazza in Programming at 03:00AM May 05, 2023 | Comments[0]
Calendar
About Me


Blog Search
Recent Posts
Recent Comments
- - Glen Mazza on Changing the row retention period for SFMC data extensions
- - venkat reddy on Changing the row retention period for SFMC data extensions
- - serxoz on Creating Chrome- and Firefox-compliant local development certificates
- - Nitin Lokhande on Deploying TightBlog on Linode
- - Anant Jaynarayana on Deploying TightBlog on Linode
About Blog
Application Server: Tomcat
Database: MySQL
Hosted on: Linode
SSL Certificate: Let's Encrypt