Glen Mazza's Weblog
 Sunday January 23, 2022
Fork of Marketing Cloud FuelSDK-Java created
I created a fork of Marketing Cloud's FuelSDK to use the latest Log4J (2.17.1 at this time of writing) and Apache CXF (3.5.0). My motivation was to fix the Log4J security issue as posters to the GitHub project were unable at the time to get the Marketing Cloud team's attention on this issue. Since the fork would need testing anyway, I also decided to upgrade CXF from the 3.1.2 dating to July 2015--which probably has its own security problems by now--to the latest 3.5.0 version from December 2021. (As of this writing, the Salesforce Team has upgraded their branch to the JDK 6-friendly Log4J 2.3.2 version, while their CXF version is apparently still at the 2015 version.)
While not all tests currently pass (those that haven't I marked @Ignored in my fork), I believe it is not related to the upgrade, that it would be the same story with main Marketing Cloud branch. I'm reluctant to run the tests fully as many are old and heavily commented out already and as I haven't a development instance of MC I'm concerned about a poorly written test damaging our production setup.
Still, through a couple of weeks at work, the fork has been running fine, we're using it to register and update subscribers and send emails, and it is providing us peace of mind that we're using the latest Log4J and CXF versions.
Posted by Glen Mazza in Salesforce at 05:28PM Jan 23, 2022 | Comments[0]
Sunday July 04, 2021
Publishing Salesforce platform events via Apex triggers and REST controllers
For change data capture and push topic events, Salesforce itself generates event messages whenever specified changes to specified objects occur. Salesforce also offers platform and generic events to allow for users to send messages of a specified structure at times of the developer's choosing. For coverage of Platform Events, Salesforce offers a Developer Guide as well as a Trailhead Module for hands-on learning.
Salesforce's generic events have their own guide but generally provide less developer support compared to platform events. For one, it is only with the CometD client that generic events can be listened to, and these messages apparently have a message size limit of 3K compared to the 1 MB provided for platform events. On the other hand, some advantages for generic events include its ability to send any arbitrary JSON as well as specify the users to receive each message. While Platform event messages will stream as JSON, they don't appear to support JSON objects within its payload. Instead, JSON objects need to be streamed as JSON strings and manually unpacked from the client receiving the message.
In the steps below I'll be featuring additional functionality beyond that covered in the Trailhead tutorial, providing examples of including data from multiple object types (here, both Accounts and Contacts in one message) as well as publishing platform events via triggers attached to specified objects and via an Apex REST controller (the latter allowing external systems to request that an event be generated.). My Salesforce Java client from a previous tutorial includes support for calling Apex REST controllers and the separate Change Data Capture (CDC) listener can be modified to read the platform events generated, as CDC events are a specialized case of platform events.
Define the custom platform event. The Trailhead tutorial shows how platform events are defined. Here, I'm creating an AccountAndContacts__e event below, to show how we can create a message consisting of multiple sObject types (here, Account and Contact), as well as generate multiple messages to report on all contacts (there is a 128K limit for contacts per message, but for demonstration purposes below I'll be limiting each message to five contacts). Note the Contact field will exist as a JSON string, containing an array of objects (for this example, we'll have the User's Salesforce ID, name, and email address). From the perspective of the platform event, however, we can define this only as a string without specifying further definition for its contents.
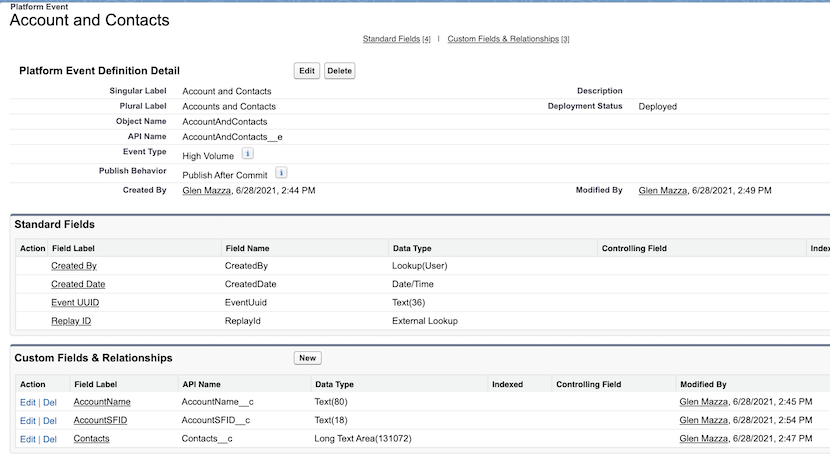
Create an Apex method (and test class) for generating platform events.. This generator will create, for a given account, one platform event message for every five contacts at that account. I keep a "calls" static variable to indicate a platform event getting published, which helps immensely when writing tests. Note as given in the comments this variable's lifetime is just within- and per-transaction and not global as it would be in Java, further helping its usage in testing.
public class AccountAndContactsEventGenerator {
    // Counter to check that this generator is being called (useful for testing objects calling the generator)
    // https://salesforce.stackexchange.com/questions/204805/test-that-a-platform-event-was-published/204806
    // Note, lifetime of this object per transaction, not system-wide as in Java, see:
    // https://developer.salesforce.com/docs/atlas.en-us.apexcode.meta/apexcode/apex_classes_static.htm
    public static Integer calls = 0;
    public static void publishAccountAndContactsEvents(Account account) {
        List<AccountAndContacts__e> events = getEventMessages(account);
        List<Database.SaveResult> results = EventBus.publish(events);
        for (Database.SaveResult sr : results) {
            if (sr.isSuccess()) {
                System.debug('Successfully published event: '+ sr);
                calls++;
            } else {
                System.debug('Error when publishing event: ' + sr);
            }
        }
    }
    @testVisible
    private static List<AccountAndContacts__e> getEventMessages(Account account) {
        List<Contact> contacts = [SELECT FirstName, LastName, Email FROM Contact WHERE AccountId = :account.id];
        // Sending one event message for every five contacts at the company
        List<AccountAndContacts__e> eventList = new List<AccountAndContacts__e>();
        AccountAndContacts__e event = initializeNewEvent(account);
        List<ContactData> contactList = new List<ContactData>();
        for (Integer i = 0; i < contacts.size(); i++) {
            if (i > 0 && math.mod(i, 5) == 0) {
                event.Contacts__c = JSON.serialize(contactList);
                contactList.clear();
                eventList.add(event);
                event = initializeNewEvent(account);
            }
            ContactData cd = new ContactData();
            Contact con = contacts.get(i);
            cd.userId = con.Id;
            cd.emailAddress = con.Email;
            cd.lastName = con.LastName;
            cd.firstName = con.FirstName;
            contactList.add(cd);
        }
        event.Contacts__c = JSON.serialize(contactList);
        eventList.add(event);
        return eventList;
    }
    @testVisible
    private static AccountAndContacts__e initializeNewEvent(Account account) {
        AccountAndContacts__e event = new AccountAndContacts__e();
        event.AccountName__c = account.name;
        event.AccountSFID__c = account.id;
        return event;
    }
    @testVisible private class ContactData {
        public String userId { get; set; }
        public String emailAddress { get; set ; }
        public String lastName { get; set; }
        public String firstName { get; set; }
    }
}
Test class: The test creates an account with six contacts (so therefore, two messages will be generated) and parses a sample of the AccountAndContacts__e messages generated to confirm they contain the expected contents. Note within Apex test cases it is not necessary to manually delete objects created as they will be rolled back automatically once the test completes.
@IsTest
public class AccountAndContactsEventGeneratorTest {
    @IsTest
    private static void testEventGeneration() {
        Account account = new Account();
        account.Name = 'Acme Corp';
        insert account;
        List<Contact> contacts = new List<Contact>();
        for (Integer i = 0; i < 6; i++) {
            contacts.add(createContact('First' + i, 'Last' + i, account.id));
        }
        List<AccountAndContacts__e> messages = AccountAndContactsEventGenerator.getEventMessages(account);
        System.assertEquals(messages.size(), 2);
        AccountAndContacts__e message = messages.get(0);
        System.assertEquals(message.AccountName__c, 'Acme Corp');
        System.assertEquals(message.AccountSFID__c, account.Id);
        List<AccountAndContactsEventGenerator.ContactData> firstFiveContacts
            = (List<AccountAndContactsEventGenerator.ContactData>)
            JSON.deserialize(messages.get(0).Contacts__c, List<AccountAndContactsEventGenerator.ContactData>.class);
        System.assertEquals(firstFiveContacts.size(), 5);
        System.assertEquals(firstFiveContacts.get(1).userId, contacts.get(1).Id);
        System.assertEquals(firstFiveContacts.get(2).firstName, 'First2');
        System.assertEquals(firstFiveContacts.get(3).LastName, 'Last3');
        System.assertEquals(firstFiveContacts.get(4).emailAddress, 'last4@yopmail.com');
        List<AccountAndContactsEventGenerator.ContactData> sixthContact =
            (List<AccountAndContactsEventGenerator.ContactData>)
            JSON.deserialize(messages.get(1).Contacts__c, List<AccountAndContactsEventGenerator.ContactData>.class);
        System.assertEquals(sixthContact.size(), 1);
    }
    private static Contact createContact(String firstName, String lastName, Id accountId) {
        Contact contact = new Contact();
        contact.FirstName = firstName;
        contact.LastName = lastName;
        contact.AccountId = accountId;
        contact.Email = lastName + '@yopmail.com';
        insert contact;
        return contact;
    }
}
Create an Apex trigger (and test class) to activate generator based on desired criteria.. Here I'm placing an after-update trigger on the Account object that will trigger the generator if the Account's name has changed. This demonstrates how the generator can be selectively activated based on the nature of changes to an object.
trigger trigger_AccountUpdate on Account (after update) {
    for (Account a : Trigger.New) {
        if (!a.Name.equals(Trigger.OldMap.get(a.Id).Name)) {
            AccountAndContactsEventGenerator.publishAccountAndContactsEvents(a);
        }
    }
}
Test class: The trigger test checks that a platform event message is generated if and only if the Account name changes. As discussed earlier, I rely on the
callsstatic variable in the generator for this.@isTest public class TestAccountUpdate { @isTest static void testUpdateWithNameChangeGeneratesEvent() { Account account = new Account(Name = 'Acme Corp', BillingCity = 'Philadelphia'); insert account; account.name = 'New Acme Corp'; update account; System.assertEquals(1, AccountAndContactsEventGenerator.calls); } @isTest static void testUpdateWithNoNameChangeGeneratesNoEvent() { Account account = new Account(Name = 'Acme Corp', BillingCity = 'Philadelphia'); insert account; account.BillingCity = 'Baltimore'; update account; System.assertEquals(0, AccountAndContactsEventGenerator.calls); } }Create an Apex REST Controller (and test class) to activate generator for a specific Account.. If you're new to Salesforce REST Controllers, recommend its Trailhead tutorial.. It shows convenient ways of making REST calls via cURL and Salesforce's Developer Workbench. Additionally, my Salesforce client has an ApexRestCaller and integrated tests showing a way to call Apex endpoints from Java.
@RestResource(urlMapping='/AccountAndContactsPE/*')
global with sharing class AccountAndContactsEventRESTEndpoint {
    @HttpPost
    global static void generatePlatformEvent() {
        RestRequest req = RestContext.request;
        String accountId = req.requestURI.substring(req.requestURI.lastIndexOf('/')+1);
        // using List<Account> instead of Account below for safer handling of no matching records
        // see: https://developer.salesforce.com/forums/?id=906F000000094QZIAY
        List<Account> accountList = [SELECT Id, Name FROM Account WHERE Id = :accountID];
        Account account = (accountList != null && accountList.size() > 0) ? accountList[0] : null;
        if (account != null) {
            AccountAndContactsEventGenerator.publishAccountAndContactsEvents(account);
        } else {
            System.debug('Could not find Account w/ID = ' + accountId);
        }
    }
}
@isTest public class AccountAndContactsEventEndpointTest { @isTest static void testGeneratePlatformEventMessage() { // Testing method: https://trailhead.salesforce.com/content/learn/modules/apex_integration_services/apex_integration_webservices Account account = new Account(Name = 'RestTestAccount'); insert account; RestRequest request = new RestRequest(); request.httpMethod = 'POST'; request.requestUri = 'https://doesntmatterignored/services/apexrest/AccountAndContactsPE/' + account.id; RestContext.request = request; // call method AccountAndContactsEventRESTEndpoint.generatePlatformEvent(); System.assertEquals(1, AccountAndContactsEventGenerator.calls); } @isTest static void testNoAccountNoPlatformEventMessage() { // creating a contact just to get a SF ID not tied to an account. Contact contact = new Contact(firstname='First', lastname='Last'); // Testing method: https://trailhead.salesforce.com/content/learn/modules/apex_integration_services/apex_integration_webservices Account account = new Account(Name = 'RestTestAccount'); insert account; RestRequest request = new RestRequest(); request.httpMethod = 'POST'; request.requestUri = 'https://doesntmatterignored/services/apexrest/AccountAndContactsPE/' + contact.id; RestContext.request = request; // call method, no PE because no Account with Contact's SF ID AccountAndContactsEventRESTEndpoint.generatePlatformEvent(); System.assertEquals(0, AccountAndContactsEventGenerator.calls); } }Subscribe to the event messages. I added a JSON supporting class and processor for this particular platform event to my Salesforce Event Listener covered in an earlier tutorial. The sample logs the contents of any messages received. Due to the trigger created in this tutorial, all that is needed is to change the name of an account in Salesforce and messages, one for every five contacts at the company, will be sent out and picked up by this listener.
Posted by Glen Mazza in Salesforce at 07:00AM Jul 04, 2021 | Tags: java salesforce | Comments[0]
Sunday May 23, 2021
Creating Chrome- and Firefox-compliant local development certificates
Below shows the steps I followed for creating keys and certificates for local development (at https://localhost:port#) of Tomcat- and Webpack DevServer-powered web applications. The process involves creating a local certificate authority (CA) with a self-signed certificate imported into Firefox and Chrome. Then I created a server key and certificate, the latter signed by the CA, to be used by both application servers. This is for work on a Mac OS with LibreSSL 2.6.5 used for the key commands, the process will vary a bit with other OS's or OpenSSL variants.
Before proceeding, there are a couple of shortcuts for working with self-signed certificates for local development, if perhaps you have only a little bit of development to do and can stand the browser unpleasantries during that time. For Firefox, you can choose to ignore the "self-signed cert" warning, with the development pages continually marked as "not secure" as a consequence. Chrome also provides a couple of options (here and here) for the same. Finally, if your motivation in creating a new key is because you've lost the public key and/or cert for a given private key, see this note on how both can be regenerated from that private key.
Create a Certificate Authority whose certificate will be imported into Firefox and Chrome. Although this certificate will be self-signed, the certificate for the server key that will be used by Tomcat and WDS will be signed by this CA. For these steps, I'm using genpkey to generate the private key and req to sign it, with a lifespan of 825 days as that's apparently the max permitted on MacOS.
(For the commands in this entry, using folders of ../certs and ../certs/ca)
openssl genpkey -algorithm RSA -out ca/MyCA.key -pkeyopt rsa_keygen_bits:2048 -aes-256-cbc
openssl req -new -sha256 -key ca/MyCA.key -out ca/MyCA.csr
openssl x509 -req -sha256 -days 825 -in ca/MyCA.csr -signkey ca/MyCA.key -out ca/MyCA.crt
Notes:
- The -aes-256-cbc setting provides for key encryption, for which you'll be asked to provide a password.
- "-sha256" is apparently the minimum accepted by Chrome, see here for further discussion.
- If asked for a challenge password, that can apparently be left blank.
- As for the configuration requested during the OpenSSL req command, I used "MyRootCA" as the Common Name for greater readability when viewing certificate chains. Note it needs to be different from the Common Name of any server certificate that it signs.
- Contents of the private key, certificate signing request, and certificate can be viewed using commands such as these:
openssl pkey -in MyCA.key -text -noout
openssl req -text -in MyCA.csr -noout
openssl x509 -text -in MyCA.crt -noout
Import the CA certificate into Firefox and Chrome.
For Firefox, menu item Firefox -> Preferences -> Privacy & Security -> View Certificates button -> Authorities -> Import MyCA.crt, then select "Trust this CA to identify websites." The CA will be listed on the Authorities tab under the Organization name you gave when creating the CSR.
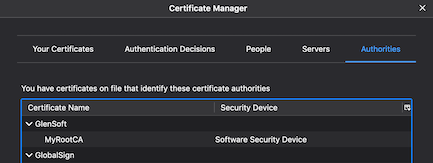
Chrome uses Apple's Keychain Access to store certificates. It can be activated from menu Chrome -> Preferences -> Privacy & Security -> Security Tab -> Manage Certificates. However, I found it clumsy to work with and simpler to use the command line:
sudo security add-trusted-cert -k /Library/Keychains/System.keychain -d ca/MyCA.crt
Once run, you'll find it under the system keychain, "Certificates" category in Keychain Access.
Create the server key in which you specify the domain name(s) applications using the key will be using. First thing to note is that Chrome requires usage of the subjectAltName extension when creating the key, Common Name alone will not work. There are several ways to configure this extension, the simplest I found that would work with my version of LibreSSL was to use an extension file as explained in the OpenSSL cookbook. (Note "TightBlog" refers to my open source project.)
Place in servercert.ext:
subjectAltName = DNS:localhost
Multiple domains can be specified, just make them comma-delimited.
Then run these commands:
openssl genpkey -algorithm RSA -out tightblog.key -pkeyopt rsa_keygen_bits:2048
openssl req -new -sha256 -key tightblog.key -out tightblog.csr
openssl x509 -req -in tightblog.csr -CA ca/MyCA.crt -CAkey ca/MyCA.key -CAcreateserial -out tightblog.crt -days 824 -sha256 -extfile servercert.ext
Configure the keys and/or certs on the development servers. For TightBlog development, the application runs on Tomcat, however I use Webpack DevServer while developing the Vue pages, so I have two servers to configure. SSL information for Tomcat is here and for WDS is here.
For Vue, I create a local-certs.js in the same directory as my vue.config.js which contains:
const fs = require("fs");
module.exports = {
  key: fs
    .readFileSync("/Users/gmazza/opensource/certs/tightblog.key")
    .toString(),
  cert: fs
    .readFileSync("/Users/gmazza/opensource/certs/tightblog.crt")
    .toString()
};
For Tomcat, I found Jens Grassel's instructions to be useful. He has us create a PKCS #12 key-and-certificate-chain bundle followed by usage of Java keytool to import the bundle into the keystore configured in the Tomcat server.xml file:
openssl pkcs12 -export -in tightblog.crt -inkey tightblog.key -chain -CAfile MyCA.crt -name "MyTomcatCert" -out tightblogForTomcat.p12
keytool -importkeystore -deststorepass changeit -destkeystore /Users/gmazza/.keystore -srckeystore tightblogForTomcat.p12 -srcstoretype PKCS12
For Tomcat, you'll want no more than one alias (here, "MyTomcatCert") in the keystore, or specify the keyAlias in the Tomcat server.xml. The keytool list certs and delete alias commands can help you explore and adjust the Tomcat keystore.
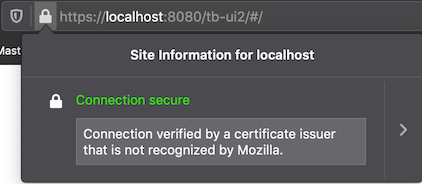
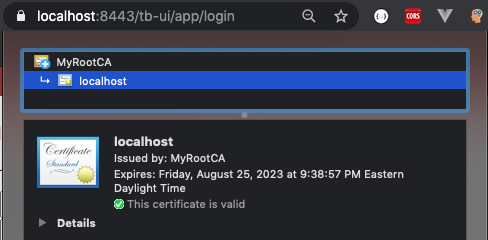
I activated the application in both browsers and checked the URL bar to confirm that the certificates were accepted. For my local development I have the application running on Tomcat at https://localhost:8443/ and the Vue pages running on WDS at https://localhost:8080. Examples showing the Vue URL on Firefox and the Tomcat one on Chrome are as below. Both URLs were accepted by both browsers, but note Firefox does caution that the CA the cert was signed with is not one of the standard CA certs that it ships with.
Posted by Glen Mazza in Programming at 07:00AM May 23, 2021 | Comments[0]
Wednesday May 19, 2021
Creating and Processing Enriched Change Data Capture Events
Salesforce Trailhead's Create a Custom Channel and Enrich Change Events tutorial shows how to create new Change Data Capture (CDC) channels providing "enriched" messages, i.e., those having certain fields always present. While CREATE and UNDELETE event messages always provide all non-null fields, UPDATE and DELETE events do not, but event enriching can be used for the latter two cases. For example, in my previous tutorial, it would be more readable to always return the Account Name in update and delete events so it can be logged alongside the Account Salesforce ID. And the tutorial gives an example of creating a custom External Account ID field in Salesforce that can be provided in every message and used to identify an account record in the external system for synchronization.
Some drawbacks/limitations of event enriching:
- It is no longer possible to send multiple changes in one event message (e.g., receiving one message that 100 Salesforce IDs of a given entity had the same field changed to a specific value), as each record will have a separate enriched field value.
- The enriched fields cannot contain elements from other entities beyond their Salesforce ID, so for a Contact message one can get the Contact's Account ID but not properties of the Account such as Name.
- It is more cumbersome to create and modify custom channels having enriched fields than relying on the default behavior from the standard CDC streams. The Salesforce Setup UI lacks this functionality, one instead can work with the Salesforce Postman project (GitHub) making REST calls against either Tooling or Metadata APIs. The Salesforce tutorial effectively shows the process using the former.
I expanded my CDC listener sample from the previous tutorial to allow for reading from a custom channel "CDCSample__chn" instead of the standard AccountChangeEvent. The channels can be switched just by adjusting the configuration file and restarting the application. Unfortunately, I was unable to get the Account "Name" property to always be provided in the message as an enriched field. I tried five or six other Account fields and they all worked fine, I'm not sure what the problem with Name is, whether my error or a Salesforce bug.
Using Salesforce's Postman project and the Trailhead tutorial, below are the commands I ran to create and configure this custom channel. Main thing to keep in mind is that a channel is a holder for message event streams, but not a message stream itself. A channel contains one or more channel members, with each member providing messages on a particular entity. It is also with the channel member that any desired enriched fields are defined.Creating the custom Platform Event Channel:
POST to: {{_endpoint}}/services/data/v{{version}}/tooling/sobjects/PlatformEventChannel
with body:
{
  "FullName": "CDCSample__chn",
  "Metadata": {
    "channelType": "data",
    "label": "Custom Channel for Change Data Capture Sample"
  }
}
There should be a success message giving the Salesforce ID of the new channel. Metadata on the PlatformEventChannel can be queried using the following GET call:
{{_endpoint}}/services/data/v{{version}}/tooling/query/?q=SELECT Id, FullName FROM PlatformEventChannel WHERE DeveloperName='CDCSample'Creating a PlatformEventChannelMember in the PlatformEventChannel. Here I'm choosing three fields to always appear.
POST to {{_endpoint}}/services/data/v{{version}}/tooling/sobjects/PlatformEventChannelMember
{
  "FullName": "CDCSample_chn_AccountChangeEvent",
  "Metadata": {
    "enrichedFields": [
      {
        "name": "Industry"
      },
      {
        "name": "Name"
      },
      {
        "name": "TickerSymbol"
      }
    ],
    "eventChannel": "CDCSample__chn",
    "selectedEntity": "AccountChangeEvent"
  }
}
The success message provides the ID for the Channel Member, whose details can be later queried with a GET similar to the following:
{{_endpoint}}/services/data/v{{version}}/tooling/sobjects/PlatformEventChannelMember/0v85e0000004Cl7AAESample output:
{
    "attributes": {
        "type": "PlatformEventChannelMember",
        "url": "/services/data/v51.0/tooling/sobjects/PlatformEventChannelMember/0v85e0000004Cl7AAE"
    },
    "Id": "0v85e0000004Cl7AAE",
    "IsDeleted": false,
    "DeveloperName": "CDCSample_chn_AccountChangeEvent",
    "Language": "en_US",
    "MasterLabel": "AccountChangeEvent",
    "NamespacePrefix": null,
    "ManageableState": "unmanaged",
    "CreatedDate": "2021-05-15T16:01:21.000+0000",
    "CreatedById": "0055e000000nMxcAAE",
    "LastModifiedDate": "2021-05-19T10:27:59.000+0000",
    "LastModifiedById": "0055e000000nMxcAAE",
    "SystemModstamp": "2021-05-19T10:27:59.000+0000",
    "FullName": "CDCSample_chn_AccountChangeEvent",
    "Metadata": {
        "enrichedFields": [
            {
                "name": "Industry"
            },
            {
                "name": "Name"
            },
            {
                "name": "TickerSymbol"
            }
        ],
        "eventChannel": "CDCSample__chn",
        "selectedEntity": "AccountChangeEvent",
        "urls": null
    },
    "EventChannel": "0YL5e0000008OIAGA2",
    "SelectedEntity": "AccountChangeEvent"
}
Above query provides the enriched fields, but for links to them specifically, this query can be used:
{{_endpoint}}/services/data/v{{version}}/tooling/query/?q=SELECT Id,ChannelMemberId,Field FROM EnrichedField ORDER BY ChannelMemberIdKeep this tutorial page handy for whenever it is needed to adjust the enriched fields of a platform event channel member. It involves PATCH requests to the endpoint originally used to create the stream.
Posted by Glen Mazza in Salesforce at 07:00AM May 19, 2021 | Tags: cometd salesforce change-data-capture platform-events | Comments[0]
Tuesday May 11, 2021
Using Spring Boot to process Salesforce Change Data Capture events
Update July 2021: Added a sample platform event processor to the Github project in support of the Platform Event tutorial.
Change Data Capture (also known as change events) in Salesforce refers to a special type of platform event in which messaging events are created based on changes to records of specified Salesforce entities like Account or Contact. Events are marked by a specific change type--CREATE, UPDATE, DELETE, UNDELETE (with additional "Gap" events when the creation of events are not possible)--allowing the subscriber to react appropriately. In Salesforce Trailhead, they are covered in the latter half of the Design Event-Driven Apps for Real-Time Integration trail. Note to some degree you can also "enrich" the messages with always-to-be-provided fields helpful for processing, see the Trailhead tutorial for more information. Enrichment does carry a risk however of having multiple messages with the same ReplayID.
I added a Spring Boot Salesforce Event Listener sample to Github that shows how change events to the Account entity can be captured and logged. To use, first create a Salesforce connected app and from the Change Data Capture screen in Salesforce Setup enable messages from the Account entity. Then rename and configure the CDC Listener application.properties~template file as explained in that file. The application can then be run as any other Spring Boot app, e.g., from IntelliJ IDEA or via command-line using gradle bootRun. Any changes you make to Accounts will result in logged output from the CDC Listener. For the purposes of this sample the CDC Listener presently reports on changes to just three Account fields--name (a String), rating (an enum), and number of employees (an int). However, it is easy to modify the AccountCDCEvent.Payload class to include whatever Account fields desired.
Sample output while editing accounts:
n.g.c.processor.AccountCDCProcessor : Account added: 0015e000002pK7EAAU, name Glen's First Account, employee count 12, rating Hot
n.g.c.processor.AccountCDCProcessor : Account updated: 0015e000002pK7EAAU: Rating to Warm
n.g.c.processor.AccountCDCProcessor : Account updated: 0015e000002pK7EAAU: Num employees to 15 Rating to null
n.g.c.processor.AccountCDCProcessor : Account added: 0015e000002pNwUAAU, name Glen's Second Account, employee count 50, rating Hot
n.g.c.processor.AccountCDCProcessor : Account deleted: 0015e000002pNwUAAU
n.g.c.processor.AccountCDCProcessor : Account undeleted: 0015e000002pNwUAAU, name Glen's Second Account, employee count 50, rating Hot
For production, the potential for Gap events will need to be handled, see the Salesforce documentation for suggested strategies.
Posted by Glen Mazza in Salesforce at 07:00AM May 11, 2021 | Comments[0]
Sunday April 04, 2021
Spring Security 5 Java client for making Salesforce API Calls
I posted to Github a Spring Boot-based client library for making OAuth2-enabled REST calls to Salesforce's API. Supported are Salesforce's JWT Bearer Token and username/password flows discussed in my earlier blog post. The library supports use of Salesforce's REST API, SOQL Query, and Apex REST functionality. It uses Spring Security's OAuth 2 client to obtain access tokens necessary for making these calls.
The integrated test cases give examples of the client in action. As they involve creating, updating, and deleting Salesforce Accounts they should be run against a non-production instance. Salesforce offers free developer instances you can sign up for. Note the test case for the Apex REST functionality will require installing this Apex REST endpoint from the Salesforce documentation. To run the tests, first create an application-test.properties file in the itest resources folder with the configuration necessary for the flow you are using. There is a template file in that folder specifying what is needed for each OAuth2 flow type. For usage of this library by other applications, this configuration would be placed in the importing application's properties file. The library's SalesforceOAuth2Config class reads that configuration, and will halt on startup with informational messages if anything needed is missing. Once done, the integrated tests can be run from IntelliJ or command-line via ./gradlew integratedTest.
The Username/Password flow is supported out of the box by Spring, but the JWT bearer token flow requires some extra classes that I implemented following Spring's source code for their standard password and client grant flows:
- SalesforceJwtBearerOAuth2AuthorizedClientProvider - For each outgoing request to a resource server, checks if the JWT Bearer Token method is being used for access tokens and also if an authorized client (i.e., one with a valid access token) is already available. If yes and no, respectively, initiates the process to obtain a new access token to use with the resource API call.
- OAuth2SalesforceJwtBearerGrantRequest - created by above class, it holds the information necessary to create the JWT bearer token for making an access token request.
- OAuth2SalesforceJwtBearerGrantRequestEntityConverter - Constructs the JWT bearer token
- SalesforceJwtBearerTokenResponseClient - Uses the JWT Bearer token created by the above class to obtain a new access token from the authorization server.
Within the app, SOQL queries are handled by the SOQLQueryRunner which provides two options for responses: a JSON-formatted string or a developer-defined parameterized implementation of SOQLQueryResponse (example in the integrated test). The latter takes advantage of the fact that SOQL queries share much common structure and need only a relatively small portion to be overridden to hold fields specific to the SOQL query.
What happens when access tokens expire? The WebClient calls have a retry(1) setting that allows for one additional call to the resource server in case of an error such as using an expired access token. In such cases, for the first call, the failure handler in SalesforceOAuth2Config removes the authorized client instance (which has the invalid access token) from memory. For the retry call, SalesforceJwtBearerOAuth2AuthorizedClientProvider notes that there is not an authorized client instance anymore so proceeds to obtain a new access token to allow the second call to proceed. This functionality can be verified by revoking the access token from either Salesforce Setup's Session Management screen or from Connected Apps usage, and confirming that a subsequent resource API call still provides the data. Code breakpoints can also be used to confirm another access token was requested.
Additional Resources
- OAuth 2.0 Client - official Spring documentation
- Carey Development - Blog contains many useful tutorials, including on logging exceptions and reporting them to clients helpful for the creation of this client library.
- Spring WebClient – GET, PUT, POST, DELETE examples
- Spring 5 WebClient and WebTestClient Tutorial with Examples
- Salesforce Username/Password Flow Example - Very helpful in creating the Username-Password flow option in this library.
Posted by Glen Mazza in Salesforce at 07:00AM Apr 04, 2021 | Tags: oauth2 java salesforce spring | Comments[0]
Sunday March 28, 2021
Making Salesforce API calls with Postman
Salesforce's Mohith Shrivastava's second Connected App tutorial shows how the JWT Bearer Token Flow can be used with Postman to obtain access tokens. Separately, SFDCStop shows how to use an access token to retrieve data from Salesforce. Summary of the process for getting an access token via JWT Bearer Token flow is given below, along with the alternative Username-Password flow.
Obtaining Access Token via JWT Bearer Token Flow
Mohith's second tutorial largely follows the Trailblazer documentation for creating the JWT necessary for obtaining an access token. First, within Postman, open a POST request to https://test.salesforce.com/services/oauth2/token (or login.salesforce.com for production) with two query attributes, grant_type hardcoded to urn:ietf:params:oauth:grant-type:jwt-bearer and assertion with a value that can be generated at JWT.io as follows:
Place
{"alg":"RS256"}in the JWT header.Place the following in the JWT payload, updating the
issvalue with the Client ID of the connected app, theaudvalue (should be eitherhttps://test.salesforce.comfor sandbox instances,https://login.salesforce.comfor all others, including developer instances), thesubwith the Salesforce resource owner (the user ID, usually expressed as an email), andexpvalue being the ten-digit current UNIX timestamp. Ensure there are no spaces or carriage returns in the payload:{"iss":"--client id--","sub":"--salesforce user--","aud":"https://test.salesforce.com","exp":"1616865336"}You may also wish to add a "jti" field (JWT ID), the value of which can be a randomly generated UUID. As stated in the Trailblazer documentation linked above, if a "jti" field is added, Salesforce will make sure the JWT hasn't been used to make a prior access token request, serving as a guard against replay attacks. If it has been used, it will return a 400 response code with message
{ "error": "invalid_request", "error_description": "jti already in use"}.-
Finally, in the Verify Signature portion, as generated in the previous tutorial, place the PublicCert.crt contents and the private key found in key.pem (including the BEGIN/END delimiters) in the corresponding boxes. JWT.io should report "Signature Verified", upon which you can copy the left-side as the
assertion valueinto the Postman call. Make the call and you should get an access token in response.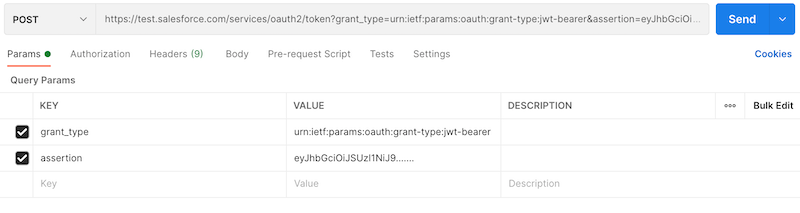
Obtaining Access Token via Username-Password Flow
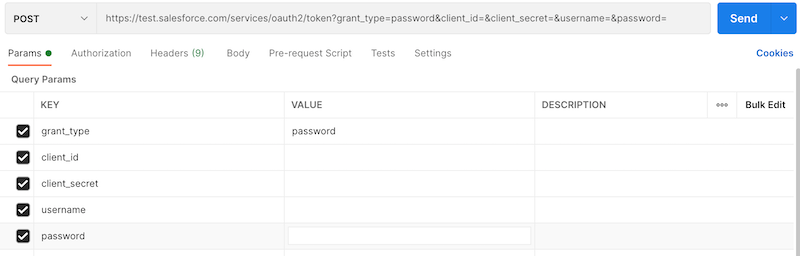
This process is much more straightforward as no keys are used. As shown in the Salesforce documentation, you can simply make a POST request with the following five query parameters: grant_type, client_id, client_secret, username, and password.
Making Salesforce calls using the Access Token
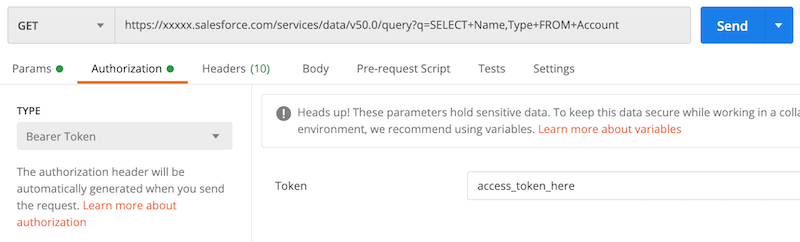
As demo'ed in the SFDCStop video, can create a GET request to say https://yoursalesforceinstance.salesforce.com/services/data/v50.0/query?q=SELECT+Name,Type+FROM+Account. Under the Authorization tab, select "Bearer", copy-and-paste the access token in, and make the API call.
More information on SOQL calls are available here.
Posted by Glen Mazza in Salesforce at 07:00AM Mar 28, 2021 | Tags: oauth2 salesforce postman | Comments[0]
Sunday March 21, 2021
Creating a Salesforce Connected App
Salesforce Connected Apps provide the conduit for data transfers between Salesforce and third-party apps. Salesforce's Mohith Shrivastava offers four-part series on Connected Apps, roughly four hours of instruction in total, helpful for visual walk-through of configuration. Below are simple steps I've followed for configuring a Connected App, but as always the official documentation should be at least reviewed to make sure all security matters are properly taken care of.
Creating credentials to access a Connected App.
The OAuth Authorization Flows section in the Salesforce Trailblazer documentation details the various methods (or "flows") available for working with Salesforce data externally. Below lists configuration for two of the flows usually best for server-to-server integration, i.e., without an active user logging in and activating the processes. For this use case, Salesforce recommends creating an integration user. Instructions here and here seem to best for creating an integration user. However, the profile options for choosing "API Enabled" and "API Only User" (i.e., user can not directly log into Salesforce) appear not to be under a "Administrative permissions" section anymore but under the System: System Permissions option when one creates the integration user's profile.
OAuth 2.0 JWT Bearer Flow: Accessing the application using a public/private key pair. Here, the public cert is uploaded to the Salesforce connected app, while the requests are signed by the client using the private key. The Connected App relies on the successful decrypting of the message to confirm the request is coming from the client. In this case, the user's login and connected app consumer key are needed by the client, but not the user's password or the connected app client secret.
A locally-made key pair is sufficient for this access technique, I've used a combination of the Java keytool and OpenSSL for this. Steps:
Create a Java PKCS12 keystore using the following command. Keystore passwords here don't matter as they will soon be discarded (keys will be worked with directly). Note that validity given below is in days, whatever value you choose, note the key will need to be replaced with it expires:
keytool -genkeypair -keyalg RSA -sigalg SHA1withRSA -validity 1095 -storepass mypassword -storetype PKCS12 -keystore tempKeystore.p12 -alias myappkey
Create a public certificate to be uploaded to the Salesforce Connected App:
keytool -export -rfc -keystore tempKeystore.p12 -storepass mypassword -file PublicCert.crt -alias myappkey
As for the public key itself, it is not needed for making Salesforce calls, but can be obtained if desired via:
openssl x509 -pubkey -in PublicCert.crt -text -noout
Finally, extracting the private key from the keystore. The private key needs to be kept secure as anyone with it can access the Salesforce Connected App, once the latter is configured with its public cert.
openssl pkcs12 -in tempKeystore.p12 -passin pass:mypassword -nodes -nocerts -out key.pem
OAuth 2.0 Username-Password Flow for Special Scenarios: Obtaining access tokens using the resource owner's username and password instead of X.509 key pair. Salesforce does not ordinarily recommend this flow, quote: "Use it only if there’s a high degree of trust between the resource owner and the client, the client is a first-party app, Salesforce is hosting the data, and other grant types aren’t available. In these cases, set user permissions to minimize access and protect stored credentials from unauthorized access."
If you're heavily using Postman to obtain access tokens, this method is much easier and faster than manually creating JWT bearer tokens, of course be careful though that the user and client credentials don't get exposed to others who shouldn't have them.
Salesforce Connected App Configuration
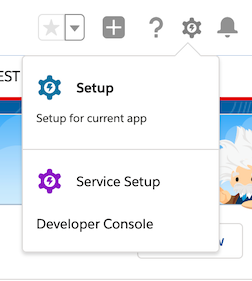
Log into Salesforce and click the gear on the upper right side to choose Setup (illustration below). Once the setup window appears, on the left-side search box search and select "App Manager". Once App Manager is up, select the New Connected App button on the right-side.
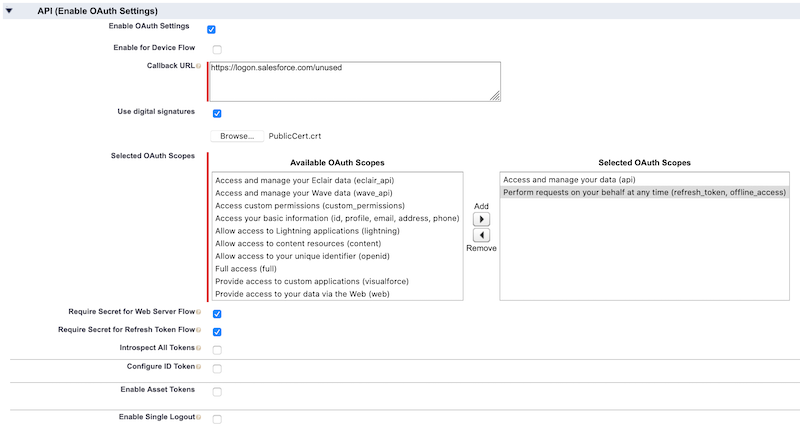
Click on the "Enable OAuth Settings" checkbox to place in configuration similar to the below. See the official documentation for an explanation of options available, also note the refresh_token role granted below would be unneeded for either of the two flows above (neither use refresh tokens). If using the Bearer Flow, be sure to click on "Use Digital Signatures", place the public key generated earlier into a file and upload. The callback URL will be ignored for either of the two flows, but a value needs to be provided regardless. When done, hit “Save” at the top, and then the “Manage” button, and then “Edit Policies” (covered in next step).
-
On the Policies page, here is where you may wish to add IP Address restrictions to limit from where approved clients may call the application. Click Save and scroll to the Profiles section (next step).
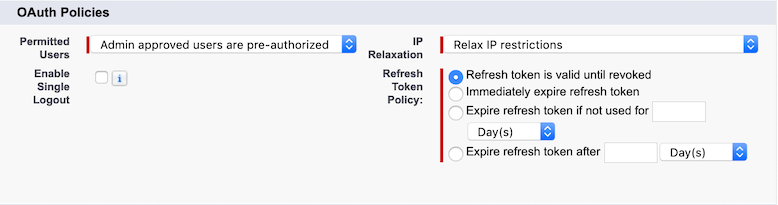
For profiles, add the profile of the User being used to make the Salesforce calls. If an Integration User profile was created as suggested above, for example, choose that. Make sure the user associated with the calls is part of that profile.
Back in App Manager, in the table of apps, go to the last column of the new connected app and choose View. As mentioned earlier, just the consumer key will be needed for the Bearer flow, but both that and the consumer secret for the Username-Password flow. As with the private key in the Bearer flow, make sure the client secret is stored confidentially, should it get exposed the connected app should be deleted and a new one which will have a different consumer key and secret created.
Posted by Glen Mazza in Salesforce at 07:00AM Mar 21, 2021 | Tags: salesforce oauth2 | Comments[0]
Calendar
About Me


Blog Search
Links
Recent Posts
Recent Comments
- - Nitin Lokhande on Deploying TightBlog on Linode
- - Ralph Callaway on Activating Transport Layer Security (SSL) for CXF web services
- - Vlad BALAN on Using X.509 security with Apache CXF
- - Juan Moreno on Switching from SOAP 1.1 to SOAP 1.2 messages
- - Anant Jaynarayana on Deploying TightBlog on Linode
- - John Power on Deploying and Using a CXF Security Token Service (STS)
About Blog
Application Server: Tomcat
Database: MySQL
Hosted on: Linode
SSL Certificate: Let's Encrypt