Glen Mazza's Weblog
 Sunday February 11, 2018
Hosting Spring Boot Applications on Kubernetes
Provided here are simple instructions for deploying a "Hello World" Spring Boot application to Kubernetes, assuming usage of Amazon Elastic Container Service (ECS) including its Elastic Container Repository (ECR). Not covered are Kubernetes installation as well as proxy server configuration (i.e., accessibility of your application either externally or within an intranet) which would be specific to your environment.
Create the Spring Boot application via the Spring Initializr. I chose a Gradle app with the Web and Actuator dependencies (the latter to obtain a health check /health URL), as shown in the following illustration.
References: Getting Started with Spring Boot / Spring Initializr
Import the Spring Boot application generated by Initializr into your favorite Java IDE and modify the DemoApplication.java to expose a "Hello World" endpoint:
package com.gmazza.demo;
import org.springframework.boot.SpringApplication;
import org.springframework.boot.autoconfigure.SpringBootApplication;
import org.springframework.boot.*;
import org.springframework.boot.autoconfigure.*;
import org.springframework.stereotype.*;
import org.springframework.web.bind.annotation.*;
@SpringBootApplication
@RestController
public class DemoApplication {
	public static void main(String[] args) {
		SpringApplication.run(DemoApplication.class, args);
	}
	@RequestMapping("/")
	String home() {
		return "Hello World!";
	}
}
Let's make sure the application works standalone. From a command-line window in the Demo root folder, run
gradle bootRunto activate the application. Ensure you can see "Hello World!" from a browser window at localhost:8080 and the health check at localhost:8080/health ({"status":"UP"}") before proceeding.Create a Docker Image of the Spring Boot application. Steps:
Create a JAR of the demo application:
gradle clean buildfrom the Demo folder will generate a demo-0.0.1-SNAPSHOT.jar in the demo/build/libs folder.Create a new folder separate from the demo application, any name, say "projdeploy". Copy the demo JAR into this directory and also place there a new file called "Dockerfile" within it having the following code:
FROM openjdk:8u131-jdk-alpine
RUN echo "networkaddress.cache.ttl=60" >> /usr/lib/jvm/java-1.8-openjdk/jre/lib/security/java.security
ADD demo-0.0.1-SNAPSHOT.jar demo.jar
ENTRYPOINT ["java","-Xmx2000m", "-Dfile.encoding=UTF-8","-jar","demo.jar" ]
The above command creates a docker image building off of the OpenJDK image along with a recommended adjustment to the caching TTL. The ADD command performs a rename of the JAR file, stripping off the version from the name for subsequent use in the ENTRYPOINT command.
Next, we'll generate the docker image. From the projdeploy folder,
docker build -t demo:0.0.1-SNAPSHOT. Run thedocker imagescommand to view the created image in your local respository:$ docker images REPOSITORY TAG IMAGE ID CREATED SIZE demo 0.0.1-SNAPSHOT 7139669729bf 10 minutes ago 116MB
Repeated docker build commands with the same repository and tag will just overwrite the previous image. Images can also be deleted using
docker rmi -f demo:0.0.1-SNAPSHOT.
Push the target image to ECR. The ECR documentation provides more thorough instructions. Steps:
Install the AWS Command-Line Interface (AWS CLI). Step #1 of AWS guide gives the OS-specific commands to use. In the
aws ecr get-login...command you may find it necessary to specify the region where your ECR is hosted (e.g.,--region us-west-1). Ensure you can log in from the command line (it will output "Login Succeeded") before continuing.Create an additional tag for your image to facilitate pushing to ECR, as explained in Step #4 in the ECR w/CLI guide. For this example:
docker tag demo:0.0.1-SNAPSHOT your_aws_account_id.dkr.ecr.your_ecr_region.amazonaws.com/demo:0.0.1-SNAPSHOT
Note in the above command, the "demo" at the end refers to the name of the ECR repository where the image will ultimately be placed, if not already existing it will need to be created beforehand for the next command to be successful or another existing repository name used. Also, see here for determining your account ID. You may wish to run
docker imagesagain to confirm the image was tagged.Push the newly tagged image to AWS ECR (replacing the "demo" below if you're using another ECR repository):
docker push your_aws_account_id.dkr.ecr.your_ecr_region.amazonaws.com/demo:0.0.1-SNAPSHOT
At this stage, good to confirm that the image was successfully loaded by viewing it in ECR repositories (URL to do so should be https://console.aws.amazon.com/ecs/home?region=your_ecr_region#/repositories.)
Deploy your new application to Kubernetes. Make sure you have kubectl installed locally for this process. Steps:
Create a deployment.yaml for the image. It is in this configuration file that your image's deployment, declare the image to use, and its service and ingress objects. A sample deployment.yaml would be as follows:
deployment.yaml:
kind: Deployment
apiVersion: extensions/v1beta1
metadata:
  name: demo
spec:
  replicas: 1
  template:
    metadata:
      labels:
        app: demo
    spec:
      containers:
      - name: demo
        image: aws_acct_id.dkr.ecr.region.amazonaws.com/demo:0.0.1-SNAPSHOT
        ports:
        - containerPort: 80
        resources:
          requests:
            memory: "500Mi"
          limits:
            memory: "1000Mi"
        readinessProbe:
          httpGet:
            scheme: HTTP
            path: /health
            port: 8080
          initialDelaySeconds: 15
          periodSeconds: 5
          timeoutSeconds: 5
          successThreshold: 1
          failureThreshold: 20
        livenessProbe:
          httpGet:
            scheme: HTTP
            path: /health
            port: 8080
          initialDelaySeconds: 15
          periodSeconds: 15
          timeoutSeconds: 10
          successThreshold: 1
          failureThreshold: 3
---
kind: Service
apiVersion: v1
metadata:
  name: demo
spec:
  selector:
    app: demo
  ports:
    - protocol: TCP
      port: 80
      targetPort: 8080
---
kind: Ingress
apiVersion: extensions/v1beta1
metadata:
  name: demo
  annotations:
    kubernetes.io/ingress.class: "nginx"
spec:
  rules:
  - host: demo.myorganization.org
    http:
      paths:
      - path:
        backend:
          serviceName: demo
          servicePort: 80
Take particular note of the bolded deployment image (must match what was deployed to ECR) and the Ingress loadbalancer host, i.e., the URL to be used to access the application.
Deploy the application onto Kubernetes. The basic kubectl create (deploy) command is as follows:
kubectl --context ??? --namespace ??? create -f deployment.yaml
To determine the correct context and namespace values to use, first enter
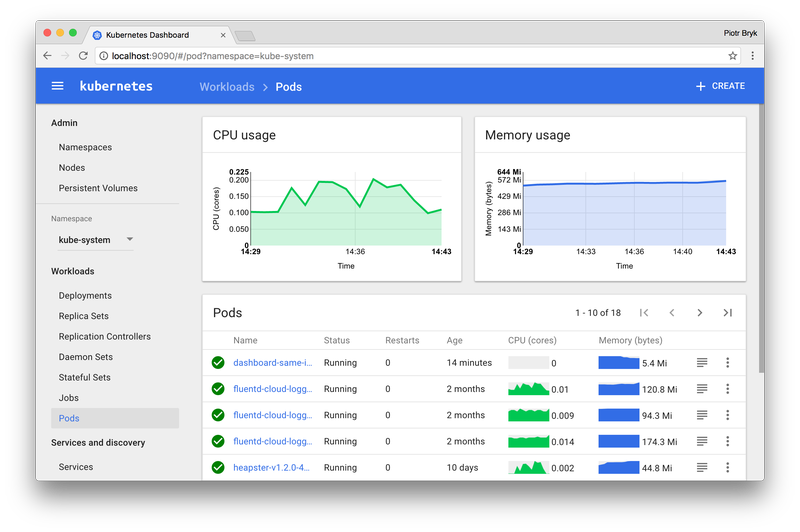
kubectl config get-contextsto get a table of current contexts, the values will be under in the second column, "Name". If your desired context is not the current one (first column), enterkubectl config use-context context-nameto switch to that one. Either way, then enterkubectl get namespacesfor a listing of available namespaces under that context, picking one of those or creating a new namespace.Once your application is created, good to go to the Kubernetes dashboard to confirm it has successfully deployed. In the "pod" section, click the next-to-last column (the one with the horizontal lines) for the deployed pod to see startup logging including error messages, if any.
Determine the IP address of the deployed application to configure routing. The
kubectl --context ??? --namespace ??? get ingressescommand (with context and namespace determined as before) will give you a list of configured ingresses and their IP address, configuration of the latter with Route 53 (at a minimum) will probably be needed for accessing your application.Once the application URL is accessible, you should be able to retrieve the same "Hello World!" and health check responses you had obtained in the first step from running locally.
To undeploy the application, necessary for redeploying it via
kubectl create, the application, service, and ingress can be individually deleted from the Kubernetes Dashboard. As an alternative, the following kubectl commands can be issued to delete the application's deployment, service, and ingress:kubectl --context ??? --namespace ??? delete deployment demo kubectl --context ??? --namespace ??? delete service demo kubectl --context ??? --namespace ??? delete ingress demo
If it is desired to just reload the current application, deletion of the application's pod by default will accomplish that.
Posted by Glen Mazza in Programming at 06:10AM Feb 11, 2018 | Comments[0]
Post a Comment:
Calendar
About Me

Blog Search
Links
Recent Posts
Recent Comments
- - serxoz on Creating Chrome- and Firefox-compliant local development certificates
- - Nitin Lokhande on Deploying TightBlog on Linode
- - Ralph Callaway on Activating Transport Layer Security (SSL) for CXF web services
- - Vlad BALAN on Using X.509 security with Apache CXF
- - Anant Jaynarayana on Deploying TightBlog on Linode
About Blog
Application Server: Tomcat
Database: MySQL
Hosted on: Linode
SSL Certificate: Let's Encrypt