Glen Mazza's Weblog
 Sunday May 23, 2021
Creating Chrome- and Firefox-compliant local development certificates
Below shows the steps I followed for creating keys and certificates for local development (at https://localhost:port#) of Tomcat- and Webpack DevServer-powered web applications. The process involves creating a local certificate authority (CA) with a self-signed certificate imported into Firefox and Chrome. Then I created a server key and certificate, the latter signed by the CA, to be used by both application servers. This is for work on a Mac OS with LibreSSL 2.6.5 used for the key commands, the process will vary a bit with other OS's or OpenSSL variants.
Before proceeding, there are a couple of shortcuts for working with self-signed certificates for local development, if perhaps you have only a little bit of development to do and can stand the browser unpleasantries during that time. For Firefox, you can choose to ignore the "self-signed cert" warning, with the development pages continually marked as "not secure" as a consequence. Chrome also provides a couple of options (here and here) for the same. Finally, if your motivation in creating a new key is because you've lost the public key and/or cert for a given private key, see this note on how both can be regenerated from that private key.
Create a Certificate Authority whose certificate will be imported into Firefox and Chrome. Although this certificate will be self-signed, the certificate for the server key that will be used by Tomcat and WDS will be signed by this CA. For these steps, I'm using genpkey to generate the private key and req to sign it, with a lifespan of 825 days as that's apparently the max permitted on MacOS.
(For the commands in this entry, using folders of ../certs and ../certs/ca)
openssl genpkey -algorithm RSA -out ca/MyCA.key -pkeyopt rsa_keygen_bits:2048 -aes-256-cbc
openssl req -new -sha256 -key ca/MyCA.key -out ca/MyCA.csr
openssl x509 -req -sha256 -days 825 -in ca/MyCA.csr -signkey ca/MyCA.key -out ca/MyCA.crt
Notes:
- The -aes-256-cbc setting provides for key encryption, for which you'll be asked to provide a password.
- "-sha256" is apparently the minimum accepted by Chrome, see here for further discussion.
- If asked for a challenge password, that can apparently be left blank.
- As for the configuration requested during the OpenSSL req command, I used "MyRootCA" as the Common Name for greater readability when viewing certificate chains. Note it needs to be different from the Common Name of any server certificate that it signs.
- Contents of the private key, certificate signing request, and certificate can be viewed using commands such as these:
openssl pkey -in MyCA.key -text -noout
openssl req -text -in MyCA.csr -noout
openssl x509 -text -in MyCA.crt -noout
Import the CA certificate into Firefox and Chrome.
For Firefox, menu item Firefox -> Preferences -> Privacy & Security -> View Certificates button -> Authorities -> Import MyCA.crt, then select "Trust this CA to identify websites." The CA will be listed on the Authorities tab under the Organization name you gave when creating the CSR.
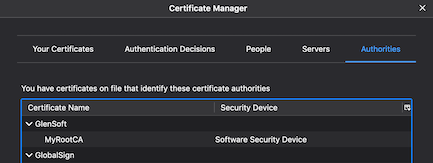
Chrome uses Apple's Keychain Access to store certificates. It can be activated from menu Chrome -> Preferences -> Privacy & Security -> Security Tab -> Manage Certificates. However, I found it clumsy to work with and simpler to use the command line:
sudo security add-trusted-cert -k /Library/Keychains/System.keychain -d ca/MyCA.crt
Once run, you'll find it under the system keychain, "Certificates" category in Keychain Access.
Create the server key in which you specify the domain name(s) applications using the key will be using. First thing to note is that Chrome requires usage of the subjectAltName extension when creating the key, Common Name alone will not work. There are several ways to configure this extension, the simplest I found that would work with my version of LibreSSL was to use an extension file as explained in the OpenSSL cookbook. (Note "TightBlog" refers to my open source project.)
Place in servercert.ext:
subjectAltName = DNS:localhost
Multiple domains can be specified, just make them comma-delimited.
Then run these commands:
openssl genpkey -algorithm RSA -out tightblog.key -pkeyopt rsa_keygen_bits:2048
openssl req -new -sha256 -key tightblog.key -out tightblog.csr
openssl x509 -req -in tightblog.csr -CA ca/MyCA.crt -CAkey ca/MyCA.key -CAcreateserial -out tightblog.crt -days 824 -sha256 -extfile servercert.ext
Configure the keys and/or certs on the development servers. For TightBlog development, the application runs on Tomcat, however I use Webpack DevServer while developing the Vue pages, so I have two servers to configure. SSL information for Tomcat is here and for WDS is here.
For Vue, I create a local-certs.js in the same directory as my vue.config.js which contains:
const fs = require("fs");
module.exports = {
  key: fs
    .readFileSync("/Users/gmazza/opensource/certs/tightblog.key")
    .toString(),
  cert: fs
    .readFileSync("/Users/gmazza/opensource/certs/tightblog.crt")
    .toString()
};
For Tomcat, I found Jens Grassel's instructions to be useful. He has us create a PKCS #12 key-and-certificate-chain bundle followed by usage of Java keytool to import the bundle into the keystore configured in the Tomcat server.xml file:
openssl pkcs12 -export -in tightblog.crt -inkey tightblog.key -chain -CAfile MyCA.crt -name "MyTomcatCert" -out tightblogForTomcat.p12
keytool -importkeystore -deststorepass changeit -destkeystore /Users/gmazza/.keystore -srckeystore tightblogForTomcat.p12 -srcstoretype PKCS12
For Tomcat, you'll want no more than one alias (here, "MyTomcatCert") in the keystore, or specify the keyAlias in the Tomcat server.xml. The keytool list certs and delete alias commands can help you explore and adjust the Tomcat keystore.
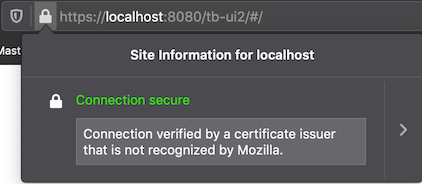
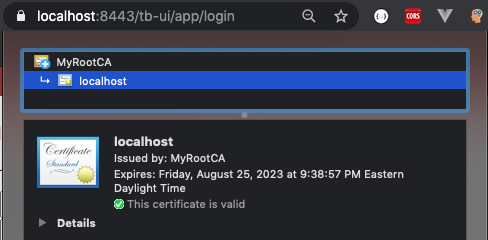
I activated the application in both browsers and checked the URL bar to confirm that the certificates were accepted. For my local development I have the application running on Tomcat at https://localhost:8443/ and the Vue pages running on WDS at https://localhost:8080. Examples showing the Vue URL on Firefox and the Tomcat one on Chrome are as below. Both URLs were accepted by both browsers, but note Firefox does caution that the CA the cert was signed with is not one of the standard CA certs that it ships with.
Posted by Glen Mazza in Programming at 07:00AM May 23, 2021 | Comments[0]
Wednesday May 19, 2021
Creating and Processing Enriched Change Data Capture Events
Salesforce Trailhead's Create a Custom Channel and Enrich Change Events tutorial shows how to create new Change Data Capture (CDC) channels providing "enriched" messages, i.e., those having certain fields always present. While CREATE and UNDELETE event messages always provide all non-null fields, UPDATE and DELETE events do not, but event enriching can be used for the latter two cases. For example, in my previous tutorial, it would be more readable to always return the Account Name in update and delete events so it can be logged alongside the Account Salesforce ID. And the tutorial gives an example of creating a custom External Account ID field in Salesforce that can be provided in every message and used to identify an account record in the external system for synchronization.
Some drawbacks/limitations of event enriching:
- It is no longer possible to send multiple changes in one event message (e.g., receiving one message that 100 Salesforce IDs of a given entity had the same field changed to a specific value), as each record will have a separate enriched field value.
- The enriched fields cannot contain elements from other entities beyond their Salesforce ID, so for a Contact message one can get the Contact's Account ID but not properties of the Account such as Name.
- It is more cumbersome to create and modify custom channels having enriched fields than relying on the default behavior from the standard CDC streams. The Salesforce Setup UI lacks this functionality, one instead can work with the Salesforce Postman project (GitHub) making REST calls against either Tooling or Metadata APIs. The Salesforce tutorial effectively shows the process using the former.
I expanded my CDC listener sample from the previous tutorial to allow for reading from a custom channel "CDCSample__chn" instead of the standard AccountChangeEvent. The channels can be switched just by adjusting the configuration file and restarting the application. Unfortunately, I was unable to get the Account "Name" property to always be provided in the message as an enriched field. I tried five or six other Account fields and they all worked fine, I'm not sure what the problem with Name is, whether my error or a Salesforce bug.
Using Salesforce's Postman project and the Trailhead tutorial, below are the commands I ran to create and configure this custom channel. Main thing to keep in mind is that a channel is a holder for message event streams, but not a message stream itself. A channel contains one or more channel members, with each member providing messages on a particular entity. It is also with the channel member that any desired enriched fields are defined.Creating the custom Platform Event Channel:
POST to: {{_endpoint}}/services/data/v{{version}}/tooling/sobjects/PlatformEventChannel
with body:
{
  "FullName": "CDCSample__chn",
  "Metadata": {
    "channelType": "data",
    "label": "Custom Channel for Change Data Capture Sample"
  }
}
There should be a success message giving the Salesforce ID of the new channel. Metadata on the PlatformEventChannel can be queried using the following GET call:
{{_endpoint}}/services/data/v{{version}}/tooling/query/?q=SELECT Id, FullName FROM PlatformEventChannel WHERE DeveloperName='CDCSample'Creating a PlatformEventChannelMember in the PlatformEventChannel. Here I'm choosing three fields to always appear.
POST to {{_endpoint}}/services/data/v{{version}}/tooling/sobjects/PlatformEventChannelMember
{
  "FullName": "CDCSample_chn_AccountChangeEvent",
  "Metadata": {
    "enrichedFields": [
      {
        "name": "Industry"
      },
      {
        "name": "Name"
      },
      {
        "name": "TickerSymbol"
      }
    ],
    "eventChannel": "CDCSample__chn",
    "selectedEntity": "AccountChangeEvent"
  }
}
The success message provides the ID for the Channel Member, whose details can be later queried with a GET similar to the following:
{{_endpoint}}/services/data/v{{version}}/tooling/sobjects/PlatformEventChannelMember/0v85e0000004Cl7AAESample output:
{
    "attributes": {
        "type": "PlatformEventChannelMember",
        "url": "/services/data/v51.0/tooling/sobjects/PlatformEventChannelMember/0v85e0000004Cl7AAE"
    },
    "Id": "0v85e0000004Cl7AAE",
    "IsDeleted": false,
    "DeveloperName": "CDCSample_chn_AccountChangeEvent",
    "Language": "en_US",
    "MasterLabel": "AccountChangeEvent",
    "NamespacePrefix": null,
    "ManageableState": "unmanaged",
    "CreatedDate": "2021-05-15T16:01:21.000+0000",
    "CreatedById": "0055e000000nMxcAAE",
    "LastModifiedDate": "2021-05-19T10:27:59.000+0000",
    "LastModifiedById": "0055e000000nMxcAAE",
    "SystemModstamp": "2021-05-19T10:27:59.000+0000",
    "FullName": "CDCSample_chn_AccountChangeEvent",
    "Metadata": {
        "enrichedFields": [
            {
                "name": "Industry"
            },
            {
                "name": "Name"
            },
            {
                "name": "TickerSymbol"
            }
        ],
        "eventChannel": "CDCSample__chn",
        "selectedEntity": "AccountChangeEvent",
        "urls": null
    },
    "EventChannel": "0YL5e0000008OIAGA2",
    "SelectedEntity": "AccountChangeEvent"
}
Above query provides the enriched fields, but for links to them specifically, this query can be used:
{{_endpoint}}/services/data/v{{version}}/tooling/query/?q=SELECT Id,ChannelMemberId,Field FROM EnrichedField ORDER BY ChannelMemberIdKeep this tutorial page handy for whenever it is needed to adjust the enriched fields of a platform event channel member. It involves PATCH requests to the endpoint originally used to create the stream.
Posted by Glen Mazza in Salesforce at 07:00AM May 19, 2021 | Tags: cometd salesforce change-data-capture platform-events | Comments[0]
Tuesday May 11, 2021
Using Spring Boot to process Salesforce Change Data Capture events
Update July 2021: Added a sample platform event processor to the Github project in support of the Platform Event tutorial.
Change Data Capture (also known as change events) in Salesforce refers to a special type of platform event in which messaging events are created based on changes to records of specified Salesforce entities like Account or Contact. Events are marked by a specific change type--CREATE, UPDATE, DELETE, UNDELETE (with additional "Gap" events when the creation of events are not possible)--allowing the subscriber to react appropriately. In Salesforce Trailhead, they are covered in the latter half of the Design Event-Driven Apps for Real-Time Integration trail. Note to some degree you can also "enrich" the messages with always-to-be-provided fields helpful for processing, see the Trailhead tutorial for more information. Enrichment does carry a risk however of having multiple messages with the same ReplayID.
I added a Spring Boot Salesforce Event Listener sample to Github that shows how change events to the Account entity can be captured and logged. To use, first create a Salesforce connected app and from the Change Data Capture screen in Salesforce Setup enable messages from the Account entity. Then rename and configure the CDC Listener application.properties~template file as explained in that file. The application can then be run as any other Spring Boot app, e.g., from IntelliJ IDEA or via command-line using gradle bootRun. Any changes you make to Accounts will result in logged output from the CDC Listener. For the purposes of this sample the CDC Listener presently reports on changes to just three Account fields--name (a String), rating (an enum), and number of employees (an int). However, it is easy to modify the AccountCDCEvent.Payload class to include whatever Account fields desired.
Sample output while editing accounts:
n.g.c.processor.AccountCDCProcessor : Account added: 0015e000002pK7EAAU, name Glen's First Account, employee count 12, rating Hot
n.g.c.processor.AccountCDCProcessor : Account updated: 0015e000002pK7EAAU: Rating to Warm
n.g.c.processor.AccountCDCProcessor : Account updated: 0015e000002pK7EAAU: Num employees to 15 Rating to null
n.g.c.processor.AccountCDCProcessor : Account added: 0015e000002pNwUAAU, name Glen's Second Account, employee count 50, rating Hot
n.g.c.processor.AccountCDCProcessor : Account deleted: 0015e000002pNwUAAU
n.g.c.processor.AccountCDCProcessor : Account undeleted: 0015e000002pNwUAAU, name Glen's Second Account, employee count 50, rating Hot
For production, the potential for Gap events will need to be handled, see the Salesforce documentation for suggested strategies.
Posted by Glen Mazza in Salesforce at 07:00AM May 11, 2021 | Comments[0]
Calendar
About Me


Blog Search
Links
Recent Posts
Recent Comments
- - Nitin Lokhande on Deploying TightBlog on Linode
- - Ralph Callaway on Activating Transport Layer Security (SSL) for CXF web services
- - Vlad BALAN on Using X.509 security with Apache CXF
- - Chans on Using SoapUI to make Salesforce Marketing Cloud API calls
- - Juan Moreno on Switching from SOAP 1.1 to SOAP 1.2 messages
- - Anant Jaynarayana on Deploying TightBlog on Linode
About Blog
Application Server: Tomcat
Database: MySQL
Hosted on: Linode
SSL Certificate: Let's Encrypt