 Sunday March 21, 2021
Creating a Salesforce Connected App
Salesforce Connected Apps provide the conduit for data transfers between Salesforce and third-party apps. Salesforce's Mohith Shrivastava offers four-part series on Connected Apps, roughly four hours of instruction in total, helpful for visual walk-through of configuration. Below are simple steps I've followed for configuring a Connected App, but as always the official documentation should be at least reviewed to make sure all security matters are properly taken care of.
Creating credentials to access a Connected App.
The OAuth Authorization Flows section in the Salesforce Trailblazer documentation details the various methods (or "flows") available for working with Salesforce data externally. Below lists configuration for two of the flows usually best for server-to-server integration, i.e., without an active user logging in and activating the processes. For this use case, Salesforce recommends creating an integration user. Instructions here and here seem to best for creating an integration user. However, the profile options for choosing "API Enabled" and "API Only User" (i.e., user can not directly log into Salesforce) appear not to be under a "Administrative permissions" section anymore but under the System: System Permissions option when one creates the integration user's profile.
OAuth 2.0 JWT Bearer Flow: Accessing the application using a public/private key pair. Here, the public cert is uploaded to the Salesforce connected app, while the requests are signed by the client using the private key. The Connected App relies on the successful decrypting of the message to confirm the request is coming from the client. In this case, the user's login and connected app consumer key are needed by the client, but not the user's password or the connected app client secret.
A locally-made key pair is sufficient for this access technique, I've used a combination of the Java keytool and OpenSSL for this. Steps:
Create a Java PKCS12 keystore using the following command. Keystore passwords here don't matter as they will soon be discarded (keys will be worked with directly). Note that validity given below is in days, whatever value you choose, note the key will need to be replaced with it expires:
keytool -genkeypair -keyalg RSA -sigalg SHA1withRSA -validity 1095 -storepass mypassword -storetype PKCS12 -keystore tempKeystore.p12 -alias myappkey
Create a public certificate to be uploaded to the Salesforce Connected App:
keytool -export -rfc -keystore tempKeystore.p12 -storepass mypassword -file PublicCert.crt -alias myappkey
As for the public key itself, it is not needed for making Salesforce calls, but can be obtained if desired via:
openssl x509 -pubkey -in PublicCert.crt -text -noout
Finally, extracting the private key from the keystore. The private key needs to be kept secure as anyone with it can access the Salesforce Connected App, once the latter is configured with its public cert.
openssl pkcs12 -in tempKeystore.p12 -passin pass:mypassword -nodes -nocerts -out key.pem
OAuth 2.0 Username-Password Flow for Special Scenarios: Obtaining access tokens using the resource owner's username and password instead of X.509 key pair. Salesforce does not ordinarily recommend this flow, quote: "Use it only if there’s a high degree of trust between the resource owner and the client, the client is a first-party app, Salesforce is hosting the data, and other grant types aren’t available. In these cases, set user permissions to minimize access and protect stored credentials from unauthorized access."
If you're heavily using Postman to obtain access tokens, this method is much easier and faster than manually creating JWT bearer tokens, of course be careful though that the user and client credentials don't get exposed to others who shouldn't have them.
Salesforce Connected App Configuration
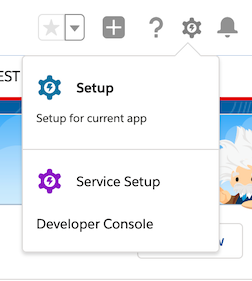
Log into Salesforce and click the gear on the upper right side to choose Setup (illustration below). Once the setup window appears, on the left-side search box search and select "App Manager". Once App Manager is up, select the New Connected App button on the right-side.
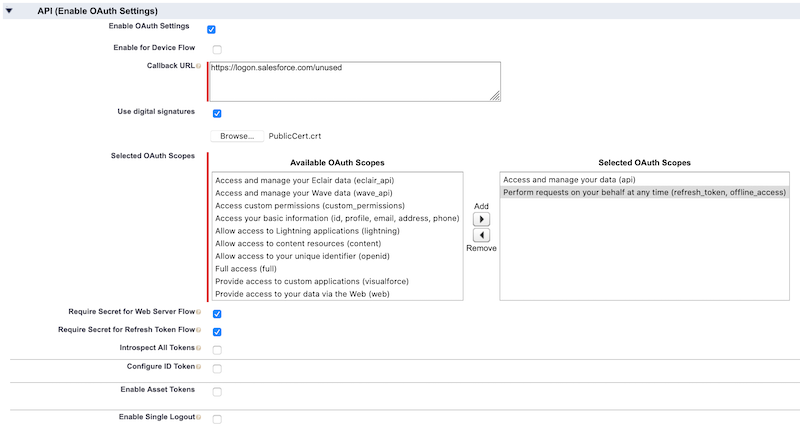
Click on the "Enable OAuth Settings" checkbox to place in configuration similar to the below. See the official documentation for an explanation of options available, also note the refresh_token role granted below would be unneeded for either of the two flows above (neither use refresh tokens). If using the Bearer Flow, be sure to click on "Use Digital Signatures", place the public key generated earlier into a file and upload. The callback URL will be ignored for either of the two flows, but a value needs to be provided regardless. When done, hit “Save” at the top, and then the “Manage” button, and then “Edit Policies” (covered in next step).
-
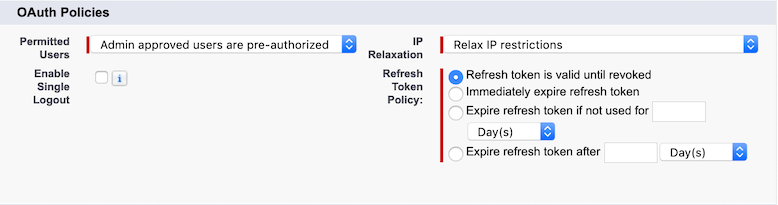
On the Policies page, here is where you may wish to add IP Address restrictions to limit from where approved clients may call the application. Click Save and scroll to the Profiles section (next step).
For profiles, add the profile of the User being used to make the Salesforce calls. If an Integration User profile was created as suggested above, for example, choose that. Make sure the user associated with the calls is part of that profile.
Back in App Manager, in the table of apps, go to the last column of the new connected app and choose View. As mentioned earlier, just the consumer key will be needed for the Bearer flow, but both that and the consumer secret for the Username-Password flow. As with the private key in the Bearer flow, make sure the client secret is stored confidentially, should it get exposed the connected app should be deleted and a new one which will have a different consumer key and secret created.
Posted by Glen Mazza in Salesforce CRM at 03:00AM Mar 21, 2021 | Tags: salesforce oauth2 | Comments[0]
Post a Comment:
Calendar
About Me

Blog Search
Recent Posts
Recent Comments
- - venkat reddy on Changing the row retention period for SFMC data extensions
- - serxoz on Creating Chrome- and Firefox-compliant local development certificates
- - Nitin Lokhande on Deploying TightBlog on Linode
- - Anant Jaynarayana on Deploying TightBlog on Linode
About Blog
Application Server: Tomcat 11
Database: MySQL
Hosted on: Linode
SSL Certificate: Let's Encrypt